Saturday, August 23, 2014

Maritime DSP

DSCF5504

I used the remnants of my Maritime DSP to create some different birthday cards.  I always need plain and boyish looking birthday cards, so I thought Maritime DSP + Age Awareness= perfect boy birthday cards!

DSCF5505

I really like this image – it’s cute and swirly, but not too much!

DSCF5506

And….once again, I like the fish on the DSP, but I don’t have any nautical stamp sets.  I cut some waves around the fish and used some scraps from the other cards and had a nice little finish.  Nothing too special or frilly for those boys!

Sunday, August 17, 2014

Maritime Ocean Gel Card

DSCF5501

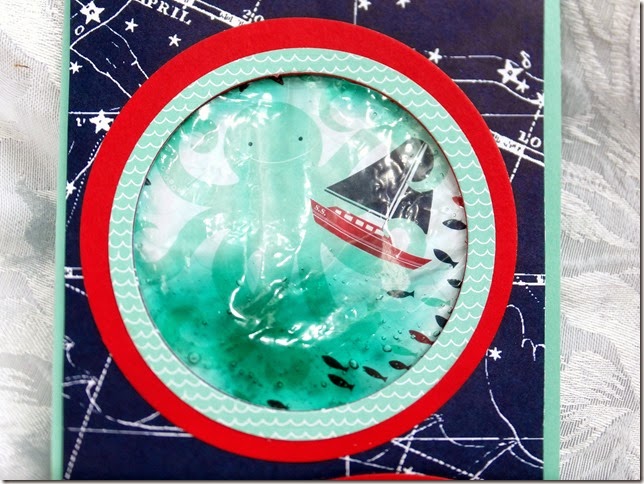
So recently I got some of the Maritime DSP to play with.  You will see quite a few cards coming that I made while playing with the DSP.  It is really cute and fun with the nautical theme.  Anyway, I loved the little octopus scene so much I wanted to really highlight it in a fun way, so I decided to make a gel card.  I haven’t made one of those in a while, so why not?! 
DSCF5502

Dimensions:

Pool Party Cardstock - 5 1/2" x 8 1/2"

Maritime Cardstock - 4" x 5 1/4",  4 X 4”, 3 ½ X 3 ½”

Real Red Cardstock - 4" x 4", Scrap – 2 X 3”

SCRAP Whisper White Cardstock - 2" x 3"

Supplies:

Boys Will Be Boys Stamp Set

Real Red Ink Pad

Pool Party Ink Refill

Circle Framelits

Project Life Cards & Labels Framelits

Aloe Vera Gel

Plastic Baggie

Sticky Strip

Stampin’ Dimensionals

Paper Snips

Instructions:

1. Fold the Pool Party Cardstock in half with a Bone Folder.

2.   Cut the Octopus image out of the Maritime DSP using the 3 ¾” circle framelit and adhere to the Pool Party base with SNAIL adhesive.

3.  Take a plastic baggie (I re-used an accessory bag) and fill it with the desired amount of Aloe Vera gel. 

4.  Add a few Pool Party re-inker drops into the aloe vera gel and mix inside the bag to the desired color .

5.  Apply Sticky Strip to the top and the bottom of the plastic bag and adhere to the Pool Party base.  Make sure the baggie will not hang out past the DSP that will cover it.

6.  Cut a 2 ¾” circle out of the Night of Navy Maritime DSP so it will go over the Octopus DSP .   Set aside.

7.  Cut a 3 ¾” circle out of the Real Red paper using Circle framelits.  Using the same piece of Real Red paper, place the 2 ¾” circle over the center and cut the inside of the Real Red circle out using the framelits. 

8.  Adhere the Real Red circle to the Night of Navy Maritime DSP, framing the circle.

9.  Cut a 3 ¼” circle out of the Pool Party Maritime DSP using the Circle Framelits.  Using the same piece of Pool Party Maritime DSP, place the 2 ¾” circle over the center and cut the inside of the Pool Party Maritime DSP circle using the same framelits.

10.  Adhere Pool Party circle to the Real Red circle, framing the circle as shown.

11.  Cut a Real Red label using the Project Life framelits.

12.  Stamp Happy Birthday sentiment using Real Red and cut the scrap to fit the label using Paper Snips. 

13.  Adhere red birthday label to the card front using Stampin’ Dimensionals.

14.  Using lots of Stampin’ Dimensionals (I used all of the outside edges of my package) adhere the card front over the plastic gel baggie. 

Tuesday, July 22, 2014

Sweet Taffy card

DSCF5304 (3)

Nothing too special about this card – simple and yet perfect for accentuating some fun patterned paper!

Dimensions:

Daffodil Delight Cardstock - 5 1/2" x 8 1/2"

Rich Razzleberry Cardstock – 4 ¼” X 4 ¾”

4 pieces of Sweet Taffy paper – 2” X 2”

4 pieces of the same Sweet Taffy paper – 1 ¾” X 1 ¾”

Accessories:

White Stampin’ Emboss Powder

Tempting Turquoise Candy Dots

Basics Hodgepodge Clips

Supplies:

Endless Birthday Wishes photopolymer stamp set

Versamark ink pad

Project Life Corner Rounder Punch

Heat Tool

Instructions:

1. Fold the Daffodil Delight paper in half with a Bone Folder.

2. Adhere the Rich Razzleberry Cardstock to the Daffodil Delight Cardstock with SNAIL Adhesive.

3. Using the Project Life corner punch, punch two opposing corners of each square of Sweet Taffy Designer Series Paper.  For instance, punch the top left and the bottom right corners of each square.

4. Adhere the 2” squares to the center of the Rich Razzleberry paper with SNAIL adhesive allowing the right angles to meet as shown. 

5.  Adhere the 1 ¾” squares to the center of each matching 2” square with Stampin’ Dimensionals allowing the right angles to meet as shown.

6.  Slide the arrow clip on the top left square.

7.  Stamp sentiment in VersaMark ink on the bottom right corner of the Rich Razzleberry paper.

8.  Emboss sentiment using White Stampin’ Emboss Powder and Heat Tool.

9.  Embellish as desired using Tempting Turquoise Candy Dots.

Monday, July 21, 2014

Geometrical set of cards

DSCF4830

Okay, so these cards are not in any special geometrical shapes, they are made using the Geometrical stamp sets.  They were inspired by some cards that I saw that were made by Andrea Walford.

DSCF4831

So first we start with the circle and triangle combination to create the pieces of candy.  If I wanted to go all out, I could add Baker’s twine and clear wrap….but I didn’t!  Winking smile

DSCF4832

I combined the Geometric stamp set with the Just Saying stamp set for a sweet little card I can sneak into my husband’s bag the next time he’s gone.

DSCF4833

And, of course, what would a good card set be without the addition of a flower?  This time the flower is made with triangles….lots of them! 

Stamps:  Geometrics, Just Saying, Something to Say

Ink:  Wild Wasabi, Melon Mambo, Pink Pirouette, Crushed Curry, Tuxedo Black (Memento), Bermuda Bay

Paper:  Crushed Curry, Bermuda Bay, Whisper White

Accessories:  Basic Rhinestones, Brads

Tuesday, July 8, 2014

CASE of the Mondays #2

I was inspired enough by this quick and easy sketch to actually create two cards for this challenge!  Yikes!

The first card was simply an attempt to use my new DSP stack All Abloom.  While it sounds like a girly stack, this turned out to be a boyish card.  Not the best picture, though….sorry.

DSCF4835

The base is Lost Lagoon (swoon!) and it is accented with Daffodil Delight paper.

DSCF4837

You probably can’t see it, but I colored the rhinestones to match with my darkest Old Olive blendabilities marker.  That just makes me happy!

My next boy birthday card uses the stamp set Boys will be Boys.  I just love that name! 

DSCF4834

For this card, I went with Andrea Popp’s idea to make my own background paper.  I repeatedly stamped the lego stamp in Daffodil Delight, Tempting Turquoise and Real Red.  What boy wouldn’t love this card?!

Stamps:  Endless Birthday Wishes, Boys will be Boys

Ink:  Daffodil Delight, Tempting Turquoise, Real Red, Lost Lagoon, Old Olive Blendabilities

Paper:  Real Red, Daffodil Delight, Whisper White, Lost Lagoon, All Abloom DSP

Accessories:  Basic Rhinestones, Candy Dots, June Paper Pumpkin

Monday, July 7, 2014

Blendabilities Class Coming Up!

DSCF4829

Here is a card I made just this weekend that was quick and easy.  My blendabilities markers made it so easy to color these beautiful flowers. 

I will be hosting a Blendabilities class on Saturday, July 19 at 1:00 p.m.  The cost for the class is $50, but it includes 2 sets of Blendabilities (Cherry Cobbler and Pumpkin Pie), as well as a color lifter pen, Memento Ink, and the Blended Blooms single stamp.  To purchase all of those items it would cost you a little more than $54 with shipping and tax! 

Everyone must register before this Friday, July 11 so that the supplies will arrive in time for our class. 

We will be learning how to use the blendabilities markers to achieve beautifully blended colors on your cards and of course we will make some lovely cards to go with them!

Stamps:  Bloom with Hope

Ink:  Memento

Paper:  Whisper White, Old Olive, Rich Razzleberry

Accessories:  Candy dots, Paper Pumpkin June, Circle framelits

Sunday, July 6, 2014

Baby Boat

DSCF4828

I got the idea for this card from Aly Schilling.  I used lots of scraps to put together this darling little baby boy card. 

The base is basic grey and the waves are made using the negative pieces of the large scallop edgelit.  The boat is a half circle stamped with the June My Paper Pumpkin stamps.  the sail is one of the straws from the kit and the mast is from the Moonlight paper pad.  Very simple!

Stamps:  Express Yourself, June My Paper Pumpkin

Ink:  Night of Navy

Paper:  Whisper White, Basic Grey, Night of Navy, Moonlight

Accessories:  June My Paper Pumpkin, Large scallop edgelit, circle framelits