Saturday, August 27, 2011

Splashing with Crystal Effects

The Sweet Peach Crop Shop Blog has a splash challenge going on right now, so I had a couple of ideas for it.  Here was one of my ideas.  I took the technique and sketch from Papercrafter's Library for this page. 
For the chipboard letters, I painted them with Tide Pool Glimmer Glam - you can kind of see the sparkles here.
Here you can see a closeup of the splashes.  To make these, I mixed Crystal Effects and Pool Party re-inker.  Next, I dribbled this onto acetate paper and let it dry.  Finally, I cut slightly around the edges and adhered it to the page.  It matches the new Pool Party colored Spice Cake patterned paper from the upcoming mini-catalogue perfectly.  And don't those buttons make great O's?! 

Thursday, August 25, 2011

We have a winner! And a few new cards, too!

I saw this darling picture over at Easy Craft Projects, so I decided to make a few cards with the bright colors. 
I didn't go exactly with the colors - I went with Lucky Limeade, Riding Hood Red, and Perfect Plum.  It was a really pretty combo.  ScrapFIT is having a scallop challenge, so used my scallop trim punch for the bottom of the front panel and then I used the new Peekaboo diecut that is coming in September.
On the inside of the peekaboo was this little horse that I colored with my Copics.  It made me think of all the animals in the picture.  It was difficult to get a good picture of it without my big finger in it! 
And since I really liked that color combo, I tried a different route.   Much more elegant looking - I love this butterfly set!  I made these for all of my customers in my club. 

And now....drum roll, please......the winner of the free sketchbook is.....

Stephanie Pezolet said...

I would love to have some inspiration :) Congrats on getting published!
A fellow PCL member

Stephanie - send me your email information to tvdurham @ newwavecomm . net and I'll get you the information you need for your free sketchbook!  Congratulations!

Monday, August 15, 2011

I'm officially published! Here's your chance to win a free copy!

At Sassy Lil' Sketches, we are happy to announce the first Sassy Lil' Sketches Ebook has been released!


The Sassy Lil' Sketches Ebook features about 70 brand new sketches designed by Cherie Averill!

You'll find sketches for layouts with one, two, three & multiple photos! You'll even find double page sketches! Plus, sample layouts from talented designers like me that will spark your creativity!

Most of the sketches use standard photo sizes (4x6, 5x7, 8x10). To get extra mileage out of the sketches, switch it up! Use the sketches to create cards, double pagers, etc.! If you need ideas for "switching it up", check out the cards in the Sample Layouts section or stop by the Sassy Lil' Sketch blog on Saturdays.

The Sassy Lil' Sketches Ebook is available for online viewing or you can easily download and print it. It's your choice!

Visit http://www.sassylilsketches.com/ to get the Sassy Lil' Sketches Ebook & get scrapping!

Now for your chances to win - you get a chance for each thing you do!
1) Leave a comment.
2)  Follow me on this blog.
3)  Follow the Sassy Lil Sketches blog.
4)  Share about this exciting new sketchbook on your blog, Facebook, or Twitter.
 
Link back in the comment section below to enter to win.  Contest ends at midnight Eastern time on Monday, August 22.  Winner will be announced on Tuesday, August 23.

One more one sheet wonder!

You saw my Christmas card one sheet wonder yesterday.  Here is the other one sheet wonder I created in the process.  Again, I used the same dimensions for the set, I just changed the color scheme and stamp set. 
For this set, I used a color combo from the Color Coach.  I used Daffodil Delight, Island Indigo, and Pool Party.  The stamp set used for these cards was Fifth Avenue Floral.  I also spritzed all of these cards with just a bit of Gold Smooch Spritz. 

Sunday, August 14, 2011

Christmas card one sheet wonder

I had a one sheet wonder card class the other day using the Delicate Doilies stamp set.  I decided since I had already made the doily cards that I would make another couple of card sets using the same layouts but different stamps. 
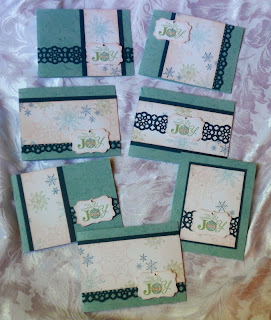
So, here is the first set of cards I made.  I used Serene Snowflakes and the Word Play stamp set.
Here's a closeup of one of the cards.  I got the color combo from some samples in the big catalogue - Blushing Bride, Baja Breeze, Not Quite Navy, and Wild Wasabi.  I added some Dazzling Diamonds to the cards, also!

Saturday, August 13, 2011

Club projects

Well, last night was the first night of our club dates.  We had only a few since it was on a Friday, but we had a great time making these projects!  Our first project was this card.  We created this card using the Big Shot and the Up, Up, & Away stamp set.  It also features the Old Olive DSP and Chocolate Chip scallop ribbon. 
Here is the other project we made - a darling little gift for a friend or co-worker.  Wouldn't this brighten someone's day?  This fits right over the top of a water bottle and has a little pocket that is the perfect size for one or two of those little packets you can use to flavor your water (Crystal Light is shown here).  If you are a club member, you can expect a tutorial on these two projects and the scrapbook pages by the end of the weekend. 
If you are not a club member, but would like the tutorials, any online order will get you all 4 tutorials!  :)
P.S. - I got these ideas from the Inking Idaho blog in my sidebar!

Tuesday, August 9, 2011

Inspired by Gigi, God's Little Princess

Sketchy Thursdays is having a Guest Design Team call, so the challenge was to use this sketch and some inspiration from reading.  I flipped the sketch to use it and got my inspiration from some of my daughter's recent favorite books, based on Gigi: God's little Princess.   She pretty much always wears pink and prances around (much like Halleigh!).  So here's the page I came up with.
You can see I went with the pink theme for the page and added a little bit of purple in for panache.  I liked the circles, but I didn't want them to all look the same. 
Here you can see where I spritzed the edges of the page with Creme Rouge Glimmer Mist and masked a few circles.  I added a few little x's like little kisses on the edges of those to make a visual triangle.  I punched several circles from the Lap of Luxury DSP that SU retired this year and distressed the edges of those.  Finally, I stamped a few circles in clear Versamark ink and heat embossed those.  I wiped off the glimmer mist and stamped a few circles in Concord Crush on top and wiped the excess ink. 
For a final little touch, I added a couple of hand-stitched hearts to the title for a little of mommy's love.  :)

Saturday, August 6, 2011

Beau Chateau scrapbook pages begin

I saw a coloring challenge at Frosted Designs, so it inspired me to create this page using my Stampin' Write markers.
I'm so proud of myself!  I just made a tutorial for this 6X6" scrapbook page we are going to be making at our club next Friday!  All club members will get this for free.  I will also be making a tutorial for the page below.
Both pages focus on the Beau Chateau DSP (which is buy 3 get 1 free right now!) and the Elements of Style stamp set. 
If you're not in my club, but you would like to get a copy of these tutorials to make the pages yourself, just make any online purchase at my online store and I'll send you the tutorials for free!  :)

Thursday, August 4, 2011

Wednesday, August 3, 2011

Pastel=Perfect for Easter pics!

I'm playing along with two sketches today.  The first one is from Creative Scrappers, a new sketch site I found.  I acutally used a Simply Scrappin' kit I got from the clearance rack a while back.  This is actually a romance based kit - probably meant for weddings and lovers...but I thought the colors were pretty useful for Easter morning pictures, too!
See what I mean?  Blue, green, pink, Cocoa?  They are just perfect for Easter.  I added some inking around the edges to make the paper stand out and I added stampin' dimensionals under each flower layer to make it a bit more 3-dimensional.  The little rhinestones are just a little icing on the cake.  Letter stickers are from doodlebug designs.

And for this sketch, I played along at Sassy 'Lil Sketches, a favorite site of mine.  Here you can see I just extended the same colors and embellishments, I just moved them around a bit.  I added a few strips of stickers/rhinestones instead of a title and added a Crate Paper ribbon for the border area.

Tuesday, August 2, 2011

Hunting in the Wind

I decided to play along with Sketchy Thursdays this week and did a double dose of the sketch.  I actually did the sketch for both sides of a double page layout - I just flipped it a bit and switched up the papers to add some contrast.
All of the paper in the layout comes from the Cheerful Treat hostess packet of paper in Stampin' Up's new catalogue.  I loved the bright and happy colors for these Easter pictures. 
Here you can see how I switched up the sketch and the papers a bit. I also changed the stamped flower to Lucky Limeade with Melon Mambo sponged around the edges.
Here's a closeup of one of those flowers from the Creative Elements stamp set.  Practical Scrappers had a challenge to create your own flowers, to do this, I actually stamped it three times and then cut around the edges to make it more three dimensional.  I cut all the way to the outside, then one layer inside, then all the way to the inside layer if that makes sense.  After that, I took a sponge dauber and sponged some Melon Mambo around the edges.  I added a stampin' dimensional under each layer to pop it up some, also.

Monday, August 1, 2011

Big Top Scrapbook Page

Now that my time on the ScrapFIT design team is over, I get to play along again!  :)  I still love ScrapFIT and the challenge this time is banners.  I like this one so much I just may have to play along again!  This paper has plenty of banners on it! 
I made this page after being inspired by a page I found at Papercrafter's library (see the link in the sidebar).  I used the Big Top line of paper and stickers from the new 2011-2012 catalogue for this page.  It came together so quickly and with so little effort!  I used the stickers to create the borders along the left side. 
Here you can see the lettering - I took Tempting Turquoise craft ink and rubbed it all over the chipboard letters and heated some Irridescent Ice EP over that.  The word memories was from the retired Summer Home Simply Scrappin' kit - I outlined the letters with Real Red to make them pop of the Daffodil Delight DSP.  I added just a couple of buttons with Cherry Cobbler baker's twine.  Very simple and easy!
Speaking of Designer Series Paper, did you know that you can get a pack of designer series paper free for every 3 packs you purchase?  I love deals like that!  It's like getting paid to shop!  My favorite!