Sunday, January 30, 2011

I jinxed myself!

I didn't think it was possible to jinx yourself when making a scrapbook page....but I found out it was definitely possible last night!  Our daughter was wound up at bedtime even after we went swimming and let her play with a friend for an hour or more yesterday afternoon.  She just wouldn't go to sleep.  When I thought she had finally gone to sleep, I started working on these scrapbook pages.  Pages about her tea party at the public library last summer.  How fitting that as I wrote that we have a tea party 24 hours a day 7 days a week, I suddenly heard some little pitter patter upstairs.  I crept up the steps to see what the sound was....evidently the tea party really is open 24 hours a day!  Down the hall she was sneaking with a little tea cup and red kool-aid....she was just a little thirsty and thought she would have a tea party....at 11:30 p.m........Argh!  I should have known that it was too good to be true!  We had put her to bed at 9:00 or so....or so we thought!  So.....now we see how true that journaling really was!  Ha!
Anyway....on to the layout.  I got the idea for both of these layouts from Paper Crafter's Library where there are tons of layouts, cards, and 3-d items in addition to great training videos.  
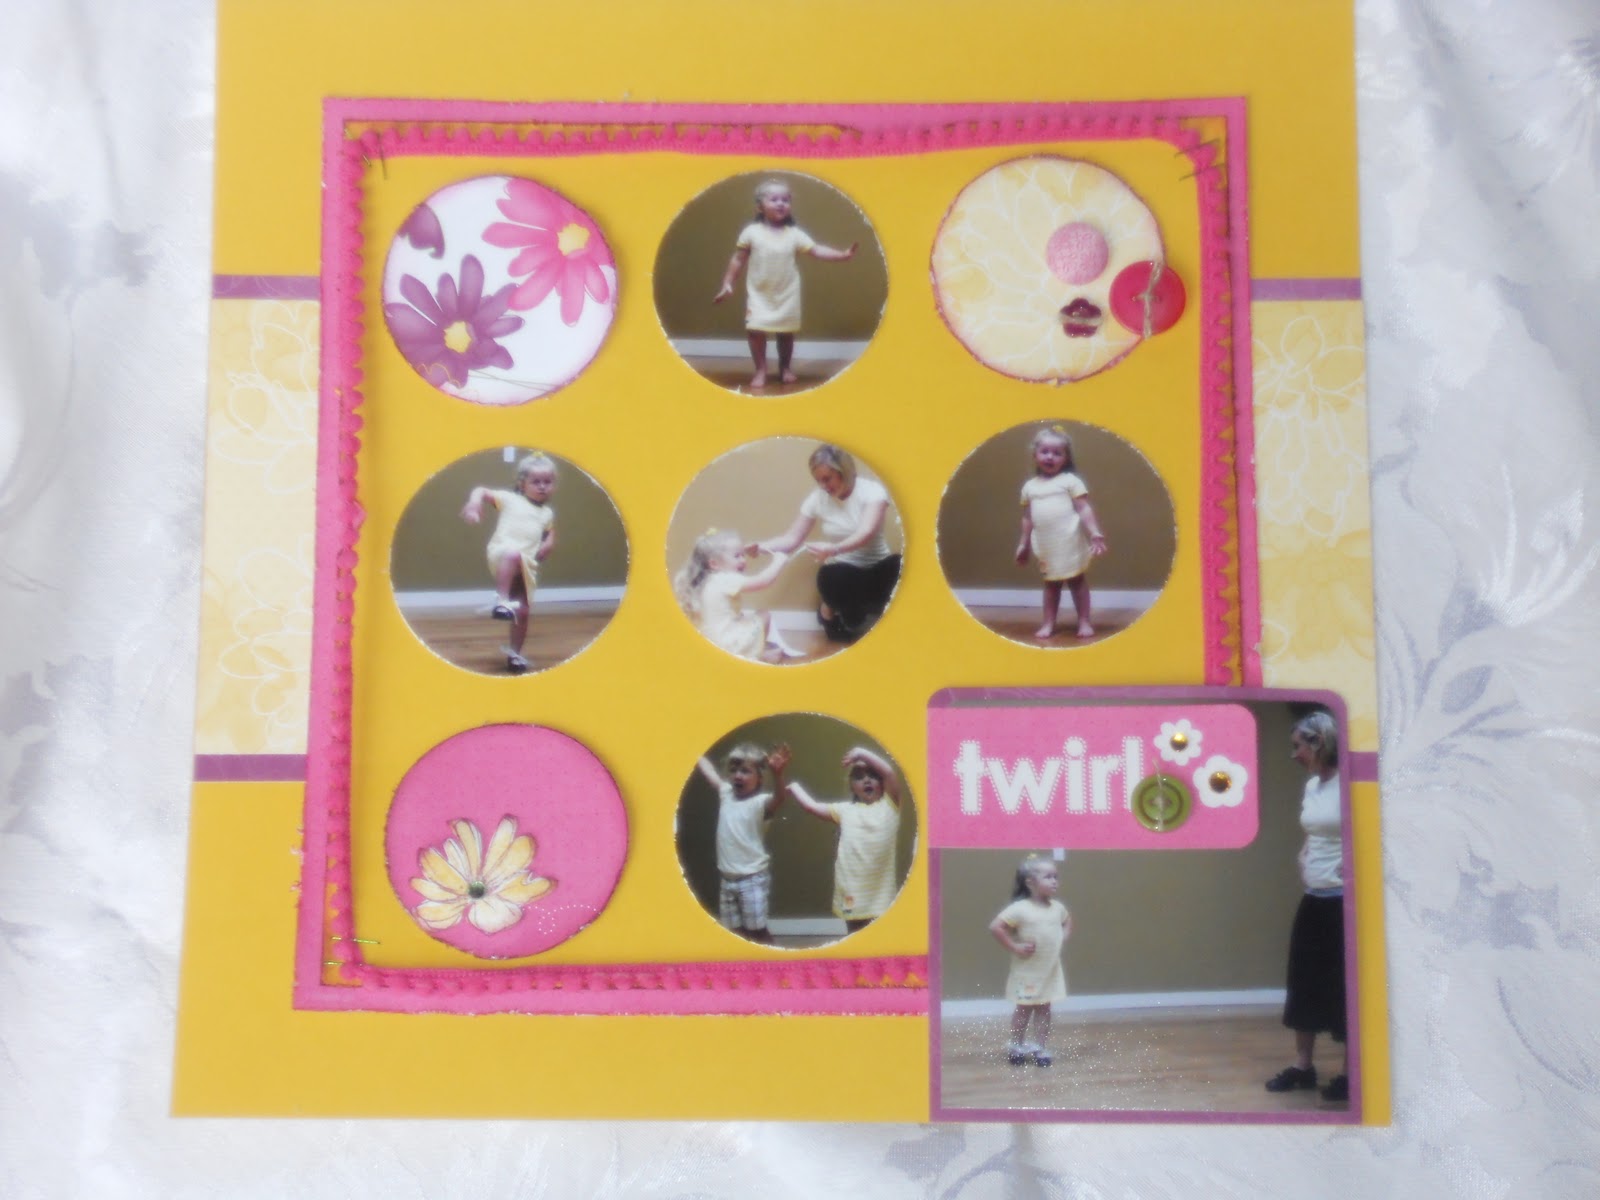
I am so proud of these letters - I just love sparkly letters!  The word tea is from Martha Stewart.  The word party is chipboard letters from SU.  To make them glittery, I smeared VersaMark all over the chipboard and sprinkled Heat and Stick powder on top.  When you heat this, it turns to glue, so that when you sprinkle glitter on the letters it sticks to the glue.  I usually set it with the heat gun just to make sure the glitter doesn't fall off and leave an empty space.  They are so sparkly on the page, though! 
Finally, I finished off the pictures with some varying patterned papers, ribbons, and buttons.

Ink:  VersaMark
Paper:  Tempting Turquoise, Whisper White, Island Oasis DSP (retired)
Accessories:  Buttons, Corduroy brads and buttons, chipboard letters, heat and stick powder, rose colored superfine glitter (All SU), heat embosser, waxy flax (CTMH), letter stickers (Martha Stewart), rhinestones (Recollections)

Saturday, January 29, 2011

Fun day with the club gals!

Wow!  What a great time we had today!  Almost all of the club members were able to come today!  Yeah!  My driveway looked like a used car lot for a little while, but that's all in the fun! 
Here's my wonderful hostess, Wanda letting her creativity shine. 

And here is her lovely card.  Isn't it darling?  I love what she did with it!
And here's Hannah with her 4 cards she made - she also got super creative with her cards as you can see below.  I just loved her idea of using the decorative label punch on the cards!  Super cute!
Did you know right now is the best time to be a Stampin' Up customer or demonstrator?  You get a free Sale-a-Bration item for every $50 you spend, plus I will send you a free step by step picture tutorial for a darling Vintage Valentine project with a video as well! 

Or you can go shop now! 

Friday, January 28, 2011

Hedgehog thanks

Here is a little card I made for the 20 youth who participated in a skit at church this past week.  My hubby is the youth minister, so we just wanted to let them know we appreciated them and that God was able to use them to touch others. 

Stamps:  Fun & Fast Notes
Ink:  Early Espresso, Crumb Cake, Chocolate Chip, Pretty in Pink, Real Red
Paper:  Real Red, Whisper White, Sending Love DSP
Accessories:   Punch (EK Success), Red Rhinestone (Kaisercraft), Sponge Dauber

Thursday, January 27, 2011

Scrap Day....I mean Snow Day today....

I found this darling sketch at Sassy Lil' Sketches this week.  I just adore their sketches....I think I do almost every one of them! Here's my take on the latest sketch:
 Obviously, this is for my daughter.....she loves fairies and she loves the Children's Garden at our local public library.  Indeed, it is a very magical place....so of course, it deserves a magical little layout to go with the pictures!  I made the banner for this page by punching stars in Pretty in Pink and some leftover DSP scraps and cutting all the triangle tips of the stars.  I started to put some ribbon over the banner, but the little pennants were so tiny I was afraid they would be swallowed!  So, I decided to use lots of those little lines of pearls.
The little fairy accents on both of these pages are from Making Memories.  The current ScrapFit workout cracked me up - it was called "Let's Strip!"  In addition to SU paper, I used some scalloped edge strips of paper borders from Making Memories.  I topped that off with a larger strip of pearls from  Mark Richards.
In this set of pictures, I continued the same basic idea, but I used some swirly rhinetones from Recollections.  Here's a closeup of the stamp from Inspired by Nature - it was really just too perfectly matched to the pictures to leave it out!  You probably can't see it, but I colored the stamp with markers, spritzed the stamp with water, and then stamped on watercolor paper. 
 Finally, here is another project from Paper Crafter's Library - you're probably going to see lots more from there!  I love the ideas that I am finding, so I just get right to work and enjoy making someone else's ideas my own!  This is an easel style calendar.  All of the months for 2011 are on here, you can just pull them off each month.  There is a little drawer at the bottom to keep a notepad and pen if you need also....or in my case, whatever treasures my 4 year old daughter decides to hide within it.  Currently it is a plastic windowcatcher she painted!  Hmmm....wonder what will be next?

Wednesday, January 26, 2011

Stinkin' cute project and a product share

Here is a stinkin' cute little project I found over at Paper Crafter's Library which is chocked full of adorable projects, cards and scrapbook pages.  I'm a non-caser, so I almost always change up the colors and DSP, so instead of using Valentine paper, I used Pacific Point paper, old DSP, and Daffodil Delight. If you look at this top picture, you can see that I debossed the Pacific Point paper with my letterpress plate.
 Here is a side view and a top view.  I like the little scallop die cut that comes with the petal box die so you can layer more cuteness at the top!

Product Share
1 6X6 piece of glimmer paper (LOVE this!)
6 6X6 pieces of Love Impressions Specialty Paper
2 pages of Love Impressions rub-ons
3 game spinners
Cost: $8.50
If you are in the Somerset, KY area and would like to pick it up, please let me know.  If you are interested in participating, but need it shipped, email me and I can add 2.95 priority shipping to get it to you.

Tuesday, January 25, 2011

Using your white space (or blue space!)

This layout was so super easy to do.  I wanted to keep the focus on the playfulness of the pictures, so I used lots of white space in this layout.  I kept the embellishments to a minimum and clustered my pictures together.
For the embellishments, I used the Apple Blossom hostess stamp set.  I also used a nice, playful and reversible piece of polka dot grosgrain ribbon for an accent.
Here's a little closeup - you can't see it from the full layout.  I stamped the circle image in Versamark and heat embossed with Irridescent Ice.  Similarly, I stamped the larger apple blossom in Regal Rose Craft Ink and heat embossed it with Irridescent Ice as well.  I finished everything off with a touch of rhinestones!

Stamps:  Apple Blossom Hostess set
Ink:  VersaMark, Regal Rose Craft Ink
Paper:  Ballet Blue, Regal Rose, Retired DSP
Accessories:  Heat embossing tool, Pigtails kiwi kiss ribbon, Rhinestones, 3/4" circle punch, 1 1/4" circle punch, scallop circle punch, Large oval punch, Tag sizzlit die cut

Don't forget!  Today is the first day of the best time of the year!!!  It's time to SALE-A-BRATE!!!  For every $50 you spend, you get a free gift!  There's no limit!!!  (Believe me, I know.....did I just say that?!??!)  Plus, when you spend $50, you get a free Vintage Valentine tutorial from me!!!!
Well, what are you waiting for?  Go shopping right now!

Friday, January 21, 2011

Drive to Win

Have you missed me?  I've been at my parents' home this week - my dearly beloved grandmother passed away at age 96.  While it is never a precious event to lose a loved one, I know my grandmother lived a very full life and was very healthy most all of the days of her life.  I know she is in a better place playing the harp for Jesus in heaven above right now!  She has reunited with my grandfather and other loved ones and all is well.
Anyway....I found this sketch at ScrapTiffany and decided to make a digital page for the sketch.
One of our friends uploaded this pic to facebook of my husband and one of his best friends.  They were in the stroller division of a local 5K....talk about competitive!  I guess if you know you can't win the age division, there's always the stroller division, huh?!  LOL

Stamp Brushes:  Athletic Dept., Extreme Elements
Paper:  Shades of Spring, Sweet Pea, Soft Suede Grid DSP
Accessories:  Write Stuff journaling, white stitching

Monday, January 17, 2011

MDS Ski Trip page

Sketchabilities had a great January 15 sketch....perfect for this pic from our ski trip this weekend.  I used MDS during our down time in the hotel to create this snowy page for the kids that came on our trip.  I used the patterned paper from the 2011 calendar set - love that you can use that paper on any project!  I also used some distressed flower stamp brushes and snow burst stamp brushes for the embellishments.  Those embellishments were topped off with basic pearls.  Finally, I added a little soft suede grosgrain ribbon and Bashful Blue Satin Ribbon. 

Host a workshop, get some card candy!

 Here is another set of projects I made based on the UStamp tutorial I found.  I used some retired DSP to create the projects and kept to a simple pattern...just changing out the color and shape on the card. 
Here is the entire set of cards.....I think I'll send these out to my online order people!
And here is some card candy and a little thank you gift.  The card candy makes creating cards like the ones above a snap!  If you like it, maybe you should book a workshop with 5 of your closest friends!  This could just be yours and one of your friends!  Plus, what better time is there to book a party....sale-a-bration is coming up....you and your friends get free products!  If you live near Somerset, KY, email me to find out when I can come over and have a stampin' party with you!

Sunday, January 16, 2011

Scrappin' the Weekend Away!

 I recently joined Paper Crafter's Library where I have found tons of resources for helping me scrapbook, create cards, and even lovely 3-d items!  In fact, I scraplifted this layout from a similar layout that I saw in the scrapbook video and picture gallery!
 Here's a little closeup of the rub-ons and flowers that are accenting the pages. 
And....just in case you're wondering if this page ever got any pictures.....yes!!!  They finally made to the page!  I made this page back in the summer.....it only took me 6 months to match up the pictures to the page!  But, hey, it turned out just perfect, I think!  :)

Saturday, January 15, 2011

Friends Rock card

 Here is the very simple layout for Our Creative Corner for this week.  The challenge was to dress the layout up in any way you wanted.  I decided to make some cards for the seniors we are taking on a ski trip this weekend.  Here are the samples of the guys card (above) and the girls card (below). 
 As you can see, I dressed it up without ribbon - I decided to use several different ways to dress it up.  I added rhinestones, I spritzed with the air spritzer, I added dazzling diamonds to the wings, and flocking to the cloud!  And, to finish it all off, I spritzed the whole entire card with Vanilla Smooch Spritz! 
Stamps:  Friends Rock
Ink:  Chocolate Chip, Pacific Point, Summer Sun
Paper:  Summer Sun, Pacific Point, Whisper White, Retired DSP
Accessories:  Air Spritzer, Dazzling Diamonds, friends rock wheel, stampin' around wheel, smooch spritz, rhinestones (Martha Stewart), Flocking (CTMH)

Friday, January 14, 2011

Happy Birthday, Nana!

In honor of Nana Norma's birthday today, I have a layout just for her.  Here she is reading a book to Halleigh this past Mother's Day (2010).  In the journaling pocket, I wrote several things for Halleigh to always know about her Nana...for instance, that her Nana loves her very much.
Below is a closeup of the bling on the page....Sketches for All is having a Bling on 2011 challenge, so they have lots of blingy challenges - this one required using pink, green and rhinestones. 
If you look really closely, you will also notice that I pleated the scalloped edge of the paper.  I creased it every 1/2" or so and then pleated it to add dimension to the border. 
Ink:  Pumpkin Pie
Paper:  Pixie Pink, Kaleidoscope DSP
Accessories:  Scallop edge punch, pumpkin pie satin ribbon, journaling pocket (My Mind's Eye?), shiny 3-d stickers (Me & My Big Ideas?), Rhinestones (Michael's)

Thursday, January 13, 2011

Sketch crazy here!

Here are a few layouts I made yesterday on my snow day.  I wasn't feeling well, so I decided to just sit and scrap.  The top layout used a sketch by Bo Bunny.  I used the Fast and Fabulous stamp set to create lots of flowers as well as some chipboard pieces from CTMH that I sponged Melon Mambo.  I used melon mambo ribbon and pom pom ribbon over a sticker border for the left hand side.  Finally, I made my title using chipboard letters.  I sponged melon mambo craft ink on the letters and sprinkled irridescent ice EP on top and heat embossed it to make them all  sparkly! 
This second layout matches the first one since it uses the same set of pics.  I used this sketch from GYSO to get lots of photos on my layout without making it look cluttered.  Wow!  6 photos!
Also, between these two layouts, I think I'm going to use up my entire  stash of melon mambo pom pom ribbon - I just love that stuff!  I used a little rub-on by Imaginisce for the title and added a button and a few rhinestones to jazz it up.  In the top corner I used some more buttons and a fabric brad to make another little cluster. 

Finally, I can't just waste all those pretty scraps!  I used some to create a card for the Tuesday Takes over at Sketches in Thyme. 
I used rub-ons for the flower image and sentiment and accented both with pink rhinestones.  I finished it off with a few flowers and a glimmer brad by making memories. 
Here's to another productive day! 

Wednesday, January 12, 2011

Puppy Love

Here is the January 7 sketch from Sassy Little Sketches.  I just loved the banner across the bottom.  Although, I guess I missed those little X's in the corners.  Funny how you don't always catch everything in a sketch!
So, anyway, here's a page I made using the sketch.  My daughter playing with a puppy her Nana and Grandad got for her to play with (sadly, it was hit by a car shortly after).  The pictures were just too darling to leave out! 
Here's a little closeup of the bottom - I purchased a vintage valentine kit from Making Memories and it had an entire bag of these little heart sequins!  I thought they were perfect for this little banner across the bottom of the page!  Plus, I loved the journaling spot, tickets and a few other accents like those buckles!

Stamps:  Filled with Love
Ink:  Pumpkin Pie
Paper:  Pixie Pink, Kaleidoscope DSP, Whisper White
Accessories:  Pumpkin Pie Satin Ribbon, Sew Suite buttons, silver cord thread
Other supplies by Making Memories - sequins, ribbon and buckles, journaling spot, tickets, tiny letter stickers

Tuesday, January 11, 2011

Valentine Defined set

This is an absolutely adorable little project I made based on a project I saw over at UStamp.  Here is the project all tucked neatly inside it's carrying case.
 Here are two of the cards - you can see I colored each of the stamps with markers to get color variations within the stamp.
Here are two more of the cards.  I used the same basic colors on each - Pretty in Pink, Real Red, and Basic Black.
I promise those Pretty in Pink flamingos are a little brighter in person!  The retired Cameo Coral color would probably be really pretty on those flamingos!

 I really love this little card to the left - I just love the definition with the bleeding heart image on top in red.
And here is the ensemble all together.

Stamps:  Valentine Defined
Ink:  Basic Black, Pretty in Pink, Real Red
Paper:  Real Red, Pretty in Pink, Basic Black, Whisper White, Real Red DSP, Newsprint DSP
Accessories:  Box #2 XL diecut, Pretty in Pink Taffeta ribbon

Monday, January 10, 2011

Crop Suey inspiration

Here is a little vintage Sony advertisement Crop Suey is using for inspiration this month.  I loved the reminder of black and white, so I just used a darker shade of red and gold for the yellow in the girl's hair. 
 Here is another 2-page spread.  I used the retired (but I still love it) Night and Day DSP and Bravo Burgundy for my accent color.   A few of these pics were the professional pics that you get when you order from the team photographer (I just hate the cheesy backgrounds, so I chopped them up to normal pictures!)
I printed out Mutiny and then stamped the word Soccer, using the soccer ball image for the letter o. 
And here is the final look at the two-page spread for this page!

Stamps:  Goal, Sweet Shoppe Alphabet
Ink:  Bravo Burgundy, Basic Black
Paper:  Bravo Burgundy, Night and Day DSP, Whisper White, shimmery gold paper from the dollar store
Accessories:  Tasteful Trim XL diecut, Fancy Flower punch, 1 1/4" circle punch, scallop circle punch, top note die cut, Black shimmer brads (Making Memories), Label and Modern label punches,