Friday, February 27, 2015

Best Day Ever

DSCF7449

I love this spunky little flower stamp in the Best Day Ever Sale-a-bration stamp set. 

For this card I used the Brights Collection.  We will be making this card during our stamp club tomorrow.  It will be held at the Pulaski County Public Library. 

Overall, the card is super easy – you just stamp the flower in different colors and add a candy dot to the center!  To help with using so many colors, keep a baby wipe to wipe the stamp off after each color – that helps keep the colors from getting mixed up in the stamp pads!

Stamps:  Best Day Ever

Ink:  Daffodil Delight, Rich Razzleberry, Pumpkin Pie, Melon Mambo, Tempting Turquoise, Real Red

Paper:  Basic Black, Crumb Cake, Whisper White

Accessories:  Candy Dots Brights

Thursday, February 26, 2015

Big Day meets Artisan Embellishment kit!

DSCF7447

I was playing with the Artisan Embellishment kit some more when I made this card. 

I used a scrap of Stacked with Love DSP to make a pennant.  After that I just layered some pieces of the artisan kit on top – a doily (which is smaller than the regular doilies in the catalogue) and some Rose Red lace ribbon.  I almost forgot that I sponged my doily with Pink Pirouette ink.

  I used another scrap for the sentiment.  The sentiment is from the Big Day Sale-a-bration stamp set.  I colored it with a Blushing Bride Stampin’ Write marker. 

You may notice those pearls are pink – I colored them with the Pink Pirouette Blendabilities marker.  I just love to do that – it is so easy and quick – and it looks so pretty!

Stamps:  Big Day

Ink:  Rose Red, Blushing Bride, Pink Pirouette Blendabilities

Paper:  Crumb Cake, Whisper White, Stacked with Love DSP

Accessories:  Artisan Embellishment kit, sponge dauber

Wednesday, February 25, 2015

You warm my heart

DSCF7448

I saw this card the other day and thought it was just sweet!  I loved the hearts in the tree with the sentiment.  I love this new stamp set, Sheltering Tree!  It is so versatile! 

Not much to say about this card – it is super simple and easy!

Stamps:  Sheltering Tree

Ink:  Chocolate Chip, Pink Pirouette, Melon Mambo

Paper:  Crumb Cake, Whisper White

Tuesday, February 24, 2015

Perpetual Birthday Calendar

DSCF7450

So the other day I already told you that I absolutely love project kits.  I decided to make the perpetual birthday calendar using the project kit in the occasions catalogue.  This was so easy to make!  I took it on vacation with me and made it while the kids were taking a nap!  How awesome is that?!

DSCF7451

Now – the kit came with lots of pretties that you could use to adorn your calendar pages.  I didn’t really want to use too many on my pages because I was afraid it would make them too thick.  Plus, I was really find with a simple look with this!  It’s functional.

DSCF7452

You’ll notice that I kept the same basic look for each page.  I find that a project is more aesthetically pleasing if I keep a basic theme and variations approach.  Mostly it stays the same with just a few changes.

DSCF7453

Part of my recipe included the terrific Perpetual Birthday Calendar stamp set that coordinates so perfectly with the kit.  The great part about this stamp set is that you can use it for anything!  I just used it to create valentines with my daughter’s class a few weeks ago!  Very versatile!

DSCF7454

Now that the project is finished….the hard part begins – adding all the birthdays and special dates to remember!  Winking smile

Stamps:  Perpetual Birthday Calendar

Ink:  Baked Brown Sugar, Blushing Bride, Hello Honey, Lost Lagoon, Melon Mambo, Real Red

Accessories:  Perpetual Birthday Calendar Project Kit

Monday, February 23, 2015

Painted Petals and Artisan kit

DSCF7445

I made this card using the Painted Petals stamp set and the Artisan Embellishment kit.  Overall it is pretty basic, but I did use a few techniques. 

I masked the sentiment image so that the stem of the flower would not go into the sentiment.

I used sponge daubers to sponge Rose Red flowers onto my Pool Party strip of paper – you can use the laser cut image over and over if you sponge through it.

DSCF7446

Finally- it is very light, but I colored the pearls with Soft Sky Blendabilities to match.  It is so easy and has such a pretty look!

Stamps:  Painted Petals

Ink:  Rose Red, Pear Pizzazz, Soft Sky Blendabilities

Paper:  Baked Brown Sugar, Pool Party, Whisper White

Accessories:  Artisan Embellishment kit, sponge daubers

Friday, February 20, 2015

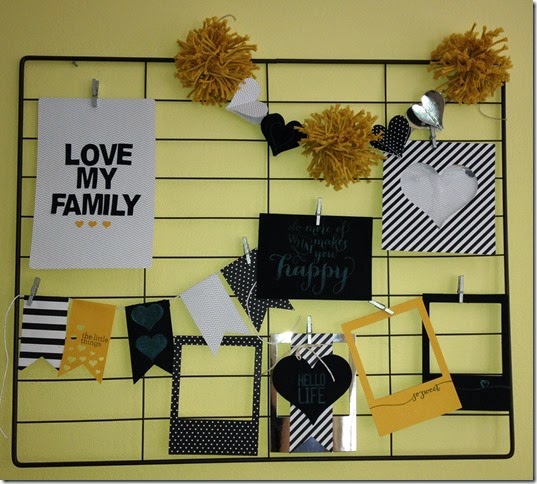
Hello Life Décor Kit

IMG_4346

Even as a demonstrator I just love all of the kits that are offered in the Occasions catalogue!  Maybe it’s just the busy mom part of me, maybe it’s the fact that I can make something cute with just a little work and all the supplies are ready for you.  I don’t know whatever it is, I’m hooked!

I actually started on this kit probably before Christmas….and then I got busy…and it got buried.   Needless to say, since our land here is buried in a good foot of snow, I thought it was a perfect time to just go on and dig this project out and finish it.  Well, almost….I still need to print a few current pictures out so I have picture of us in the frames!

IMG_4348

These are the frames where our pictures will go – we only need 3.  Sad that I don’t have any printed from the last 2 years, huh!?  I’ve been a little behind on my scrapbooking I believe! 

IMG_4347

So…the other great thing about using kits is that you can take the ideas given and customize them to fit your needs.  I decided this might look good in our kitchen.  Our kitchen is yellow with a birdhouse theme.  While this is not a birdhouse them or the same color of yellow, I thought it would fit well!  I used the aquamarine chalk ink to stamp all of my images.  One of the birdhouses in the border is the same shade of aquamarine, so I thought that was a pretty good color to use. 

TIP:  When using the chalk ink on the chalkboard paper purchase the re-inker to go with it!  Go on and add ink immediately to the aquamarine pad – lots of it!  For whatever reason, the aquamarine ink color doesn’t really show up on the chalkboard paper at first.   Adding clear embossing powder and embossing it just makes it worse!  (Ask me how I know!)  Make the pad as juicy as possible and slather the ink on like crazy and then stamp.  It will eventually stand out from the chalkboard paper! 

Also, when you have stamped your image you can set it out to dry or you can set the image much more quickly with your heat tool. 

Hope you enjoyed the tips and the projects!  I’m pretty pleased with the project overall.  If I wanted to change something, I would likely change the pom pom material.  Mine just weren’t as pretty as the picture!  Winking smile

I’ll pull out another project to show you soon!

Stamps:  Hello Life

Ink:  Memento Black, Aquamarine chalk ink

Accessories:  Hello Life Project Kit (I only added adhesives – Tombow glue and Sticky Strips)

Thursday, February 19, 2015

Big Day birthday card

IMG_4343

I made this for a sketch challenge this week.  I tried stamping the main image with the aquamarine chalk ink on the black chalkboard paper.  I am going to have to keep working on this chalkboard technique! 

I colored the birthday cake image with Bermuda Bay and Calypso Coral Blendabilities.  I accented the shadow with Smoky Slate and the candle with Daffodil Delight.  When I was finished, I accented the images with Dazzling Diamonds. 

Stamps:  Big Day

Ink:  Aquamarine Chalk Ink, Memento, Blendabilities

Paper:  Calypso Coral, Whisper White, Chalkboard Paper, Maritime DSP

Accessories:  Dazzling Diamonds