Sunday, August 30, 2009

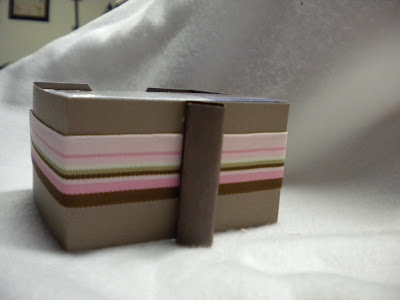
Handmade mini-albums


My husband has been wanting me to make little scrapbooks of some pictures we had from an afternoon we spent with his family. The task seemed somewhat daunting, but really I just needed a little inspiration.
I ended up making a little mini-album for his dad and his brother (don't tell - I haven't given them away yet!) I tried to use a basic concept for the albums so that it would focus on the pictures and be quick to put together and it worked!
I used the Manchester designer paper that is now retired. It works for men and I made it without using ANY ribbon (quite an accomplishment for me!)
I had this idea because I had some envelopes that I purchased that didn't work with the A2 card size. I hate to waste things like that, so I decided to use them to make an album. I just followed someone else's idea and adhered the flaps to the envelope above it.
I used 2 stamp sets for this album: Wanted and Party Hearty (it was his dad's birthday on this occasion).
Below is a similar album that I made for Toby's brother. I didn't use envelopes in it - just pages of cardstock.

Tuesday, August 25, 2009

20 years sure goes by quick!

My husband's 20th high school reunion is coming up this weekend....wow! That makes me feel old!
These are a few of his high school buddies (and our kids!) at a basketball game this spring. They are the briarjumpers...thus...the bunny. Or, Flopsy, Mopsy, and Cottontail as Halleigh sees it!
If you live around here and you are a Somerset city school scrapper, by the way, this is the perfect color combo for your school colors! And there was NO RIBBON to make the hubby happy (he doesn't allow ribbon on any boy-ish projects...heaven knows what I'll do if I ever have a boy!)
Stamps: Serene Spring
Ink: Basic Black, Crushed Curry
Paper: Elegant Eggplant, Crushed Curry, Whisper White
Accessories: Gingham brads, watercolor paper, watercolor pencils, blender pen, sticky cuts, purple glitter, purple gems

Monday, August 24, 2009

silence + baby powder....uh, oh!

This is the wierdest upload. It just took about 10 times to get this to turn the right way! It looked fine in My Pictures, but then it would always turn when I wanted to upload it.....
Anyway...I finally can talk again! Hopefully I can make it through a school day tomorrow (as long as none of the kids are listening to me sing!)
I'm sure if you are a mommy, you know that the sound of silence usually means mischief or silliness. In this case silence + a bottle of baby powder = one piece of "artwork" by a 2 year old! Might as well catch it on a picture and scrap it!
I thought I'd go with a very whimsical layout and color scheme to match the mood. {By the way, I didn't really mean for the pink to match the tile....WHO puts PINK tile in the entryway to a home? NOT ME...but it's not something I can change, now is it?}
I think I've been home and not talking to people for too long now! Too many tangents....!
Stamps: Jumble Alphabet, Office Accoutrement, Sweet Centers
Ink: Kiwi Kiss, Pink Pirouette
Paper: Elegant Eggplant, Kiwi Kiss, Urban Oasis DSP, Pink Pirouette, Pretty in Pink
Accessories: Circle punches, 5 petal punch, Kiwi Kiss corduroy buttons, Fleurettes, Elegant Eggplant ric rac, rub-ons

Sunday, August 23, 2009

New shimmer paint is Snow pretty!

Well, it seems as if I cast a shadow onto my picture and didn't realize it until just now. I just recently scrapped a few pics from our poor little excuses for snow this past winter. I guess we should be glad we get 2 cm of snow, since there are places in the world that never see snow!
I came up with a really soft color combo that I enjoyed using for this snow page. I used Pink Pirouette, Very Vanilla and Not Quite Navy. It really surprised me how nicely these colors work for a snow page!
You'll notice a lot of Irridescent Ice Embossing powder on the snowflake image in Pink, I also rubbed VersaMark all over the Vanilla/Navy snowflake to add some shimmer and finally, I painted the largest snowflake using the new line of shimmer paint! To add a final touch of glistening snowy feel, I rubbed VersaMark over all of the title letters and embossed them in Irridescent Ice embossing powder as well. Here's a little close-up - isn't it lovely?
Stamps: Serene Snowflakes
Ink: VersaMark, Not Quite Navy
Paper: Vellum polka-dotted paper, Not quite Navy, Pink Pirouette, Very Vanilla
Accessories: Very Vanilla brads, Scallop circle punch, scallop edge punch, 1 3/8" and 1 3/4" circle punches, light blue felt ribbon, KI Memories letters, Making Memories journaling page

Saturday, August 22, 2009

Swap cards

Only 3 more weeks until I get to go to my first Stampin' Up regional seminar! So, since I'm sick, I figure I might as well start working on my swap cards.
As you can see, I ran out of Pretty in Pink and had to go with Bermuda Bay in its place.
Also, since I wanted to switch the colors in the center, I decided to switch the background color, also. Thus, the same card, different colors.
Quite a striking combination of colors. Rather interesting I thought.
Stamps: Sweet Centers, Note to Self
Ink: Melon Mambo, Basic Black, Whisper White Craft
Paper: Basic Black, Melon Mambo, Whisper White, Bermuda Bay or Pretty in Pink
Accessories: Scallop edge punch, 1 3/4", 1 3/8" and 1 1/4" circle punches, corner rounder punch, various ribbons include Bermuda Bay, Melon Mambo, and Whisper White Satin

Friday, August 21, 2009

Another flowerpot card with leftovers

So since I'm home sick with laryngitis and ragweed season mayhem (if you have allergies, you know what I mean!)....I decided at least I can scrapbook and stamp even if I can't talk!
Here is a leftover flowerpot from my April club meeting. I decided to change the flowers from my original creation. I made these nice and quick little flowers using the scallop circle punch. I just cut little slits at each groove and then put a pop dot and a 3/4" circle on top to finish it off.
Stamps: 8 Great Greetings
Ink: Old Olive
Paper: Close to Cocoa, Whisper White, So Saffron, Ballet Blue, Chocolate Chip
Accessories: Eyelet border punch, scallop circle punch, 3/4" circle punch, So Saffron grosgrain ribbon

Thursday, August 20, 2009

Summertime Noel

I think the technique used for this card is called reverse embossing. You sponge or brayer ink onto Whisper White (I used Tempting Turquoise and Orchid Opulence) and then stamp images in VersaMark over that. Next, you brayer a darker ink color all across the entire image - for that I used Rich Razzleberry.
To finish off the card, I took a square of Tempting Turquoise, stamped Noel onto it and then tore it in half. I used glue to add a little glitter to the torn edges (I wanted to go with the snowy look!) and finally added a sliver of Rich Razzleberry ribbon with the horizontal slot punch.
Stamped images are from Serene Snowflakes (coming out soon!) and Many Merry Messages.
Don't forget to try for a little blog candy at http://stampintracy.blogspot.com/
Or better yet, enter a clean, graphic holiday card in the contest at Cath Edvalson's Moxie Fab World! http://www.moxiefabworld.com/2009/08/stretch-your-holiday-style-clean.html

Wednesday, August 19, 2009

Diagonal gate gold card

All right, here is the last of our swapped items. Isn't this cute? It's a gate fold card with a diagonal gate. I love it!
Stamps: A Little Somethin'
Ink: Riding Hood Red
Paper: Washington Apple DSP, Riding Hood Red, So Saffron, Pumpkin Pie
Ribbon: So Saffron

Tuesday, August 18, 2009

Cute gift box

Here is another one of the swaps we made at our club meeting. This is just a cute little pink pencil box from Wal-Mart. We stamped a combination of stars and holly leaves using Pink Passion and Wild Wasabi. The scallop edge punch was used to make the edges and I'm not sure about the rest of her items.
This would be a great little box to keep all of your gift tags in as well as a darling little gift holder. You know, there are some really cute jewelry gifts in the upcoming mini-catalogue that would fit this perfectly!

Monday, August 17, 2009

Notepad holder

Yesterday at our club meeting we had a swap, so each member who attended brought an item for us to create as a shoebox swap.
This is one of the items we made. It was a notepad holder - so cute! The notepad came from the dollar store here in town. Forgive me....I forgot which stamp set she used - I do remember that it looked like a hostess set from 2006. On the back is a pen holder. Too cute!


Saturday, August 15, 2009

Starbucks card

Well, this card is literally a Starbucks card! I had a gift card that I used from Starbucks and decided it was just way too pretty to throw away. So, being the earth-friendly little packrat that I am, I turned it into part of a card.
After I got to looking at it, I found a rather interesting color combo - Certainly Celery, Melon Mambo, and Pink Pirouette (along with Chocolate Chip/Kraft/Whisper White).
I used the Bitty Buds stamp set to create the background on the white cardstock and a rub-on for the exterior and interior sentiments.

Friday, August 14, 2009

Liz's Sketch #67

Okay, I must preface this blog post by saying that my poor little 4 year old digital camera is officially a dinosaur...thus the terribly poor photo (even though it is right under two very bright lights!). That just makes me sad.
Anyway, I decided to make a scrapbook page based on Liz's sketch #67 (see her blog link to the right - it's Scrapbooking, Sketches, and Life, Oh My!) I love her sketches and enjoy using sketches to help design my pages.
I altered the sketch to fit my page elements a bit, of course, but I liked the sketch.
I decided to call this layout Make Way for Ducklings, because the pictures are of us waiting for the daily parade of ducks at the Peabody Hotel in Memphis (notice there are no pics of the duck parade because it lasted all of 10 seconds and the dinosaur camera couldn't handle the poor lighting!)
Color scheme and flowers inspired by the Making Memories journaling block.

Tuesday, August 11, 2009

New stamps....new toys (I mean new inspiration!!!)

Okay, so I admit! I am officially an addict. I am addicted to stamping and I must say that I have learned SO MUCH MORE about stamping since becoming a Stampin' Up demonstrator that it is really unbelievable! I always enjoyed scrapping and papercrafting before, but now I have so many tools that help me as a demonstrator - a terrific website, a delightfully inspiring magazine that leaves me waiting for more each month, and terrific demos that I learn from each day through the web! I didn't even make this post a plug for becoming a demonstrator...it just happened!
Anyway, I got in a whole new set of stamp sets yesterday and just had to sit down and create more with some of my sets! I was so proud of myself when I got finished. The blue is a little fluorescent in the picture, but it really looks nice in person. I liked the brown/turquoise color combo at http://www.thepinkelephantchallenge.blogspot.com/ and have really enjoyed the Stamps, Ink, and Paper challenge on http://www.soshelli.com/ website. So that is where this card set came from.
All right...all of the cards stick with this basic recipe:
Stamps: Wings of Friendship (and one card uses the for you from Fresh Cuts)
Ink: Chocolate Chip, Tempting Turquoise
Paper: Kraft, Whisper White, Chocolate Chip, Tempting Turquoise, Pink Flamingo DS

Saturday, August 8, 2009

Now I wish I had Teeny Tiny Wishes!

You know it's funny how I can order some stamp sets and then think I can live without other ones because I have enough already. Then I get an idea for a card and try to find the perfect sentiment only to decide that I don't have anything that works just right! Ack! That's how I feel about the Teeny Tiny Wishes stamp set now!
I just absolutely love the way the word windows punch looks when placed inside the Modern Label, but I realized that I don't have too many actual sentiments that fit inside the Word Windows punch! Ahhh....such is life...you can never have enough beautiful stamps, now can you?!

Friday, August 7, 2009

Memphis or Bust!

I guess I just bleed blue! It's the Kentucky fan in me! These are a few pics from a trolley ride in Memphis at New Years.
Paper: Pink Passion, Brilliant Blue, Whisper White, Bella Rose DSP
Other: Circle punches, Thickers by SEI, stickers by Arctic Frog, and Rub-ons/Rhinestones by Bazille

Wednesday, August 5, 2009

SIP - Stamps, Ink, and Paper

Well, as an avid scrapper with a challenge to use only Stamps, ink, and paper, this challenge from Shelli, the founder of Stampin' Up, was definitely interesting. I found some paper in the Tall Tales paper that was absolutely a gorgeous scene. I just hate to cover scenes like that up! Furthermore, they don't exactly make a mirror image to spread across two pages, so I thought I would use the elements of the patterned paper to create my own scene. Since we weren't supposed to use anything other than stamps, ink, and paper, I tried to create texture other ways.
First, I made a layout that is very DIFFERENT from my usual linear style of scrapping. For my title, I traced the letter Z from my sticky cuts onto the polka dotted clear overlay paper and cut it out. To create the Os, I punched a 1 1/4" circle and then a 1 3/4" circle around that. I then filled the hole with a spotlight of a few zoo animals covered in Crystal Effects. By the way, did you notice the word baby? It was a set of leftover stickers from the Baby Girl simply scrappin' kit I had used for my little niece!
On with the details...I decided I wanted a few of the pictures to kind of come out of the scene in the landscape. Therefore as I made a landscape I used some crumpled pieces of So Saffron dipped in Chocolate Chip to continue the So Saffron land in the DSP. Additionally, the chocolate chip ink on that paper made it blend in with the rocks for my sea lion to stand on. Next, I took some Old Olive paper and used the Damask texture plate to create more texture (that you can't see in this picture!).


The color is off in this picture, but you will notice that the Brilliant Blue paper on which the sea lion is sitting has 1/2" and 3/4" circles of Brilliant Blue and the polka dot clear overlay pages cut out and covered in Crystal Effects. I thought this would help the sea lion look like he really was sitting in a pool of water! Plus, I just hated to waste the excess pieces of overlay paper that I had used to create the title. You can't really tell from here, but I added a Rose Red giraffe in my balloon and added a few Stampin' Dimensionals underneath the balloon to make it appear as if it were floating through the sky.
Finally, a good scrapbook page is not complete without a little journaling, so I hid the journaling block behind this picture so that it would not take up extra space.
While this may be no great work of art, it is certainly work of the heart. And that is what SU is all about! As my little Zoo Baby, Halleigh, said, "I think daddy will like your picture when he gets home!" I hope so....I always have to remind myself that it is not about making other people happy or impressed - it is about preserving our memories in a way that makes my family happy! Mission Accomplished!

Tuesday, August 4, 2009

Back to School sets

My most recent club hostess is a darling high school student, so I decided to make notebooks, corner bookmarks, and magnets with her friends as we all get ready to go back to school Thursday. (Boo hoo! Time for all of us teachers to start getting up early again...). The set above was inspired by the journal in our Stampin' Success magazine. You'll notice the bottom butterfly has a yellow center - I hate to just throw away even those little scraps from the scallop edges, so sometimes I use them to create a center of a butterfly - it is just the right size for that large butterfly. If you split it in half, you can make smaller antennae, also.
Stamps: Razzle Dazzle
Paper: Melon Mambo, Rich Razzleberry, Crushed Curry, Whisper White, Razzleberry Lemonade DSP
Ink: Silver, Melon Mambo, Rich Razzleberry
Other: Scallop edge punch, Rich Razzleberry polka dot ribbon, silver threading, silver brads, Modern Label punch, Bigz butterfly diecut, Sizzix machine, Scallop circle diecut, 5 petal flower punch, various circle punches, magnet sheets, glitter sticker paper

Here is the set that my hostess and I both liked the best. I'm a nature girl, so this one was more simple and sweet.

Stamps: Good Friend

Paper: Pacific Point, Whisper White, Good Morning Sunshine DSP

Ink: Pacific Point, Summer Sun

Other: Eyelet Border punch, Scallop Circle diecut, flowers layers #3 diecut, pacific point corduroy button, pacific point ribbon, chocolate chip grosgrain ribbon, circle scissor plus, glitter sticker paper