Saturday, January 7, 2012

All Occasion Card set

I found this all occasion card set by Melissa Huie on UStamp this week.  She used a different color scheme, but I absolutely adored the whole set, so I decided that it would be a good set to make last night. 
Here is the card box - you can see it better in the picture above - the lid has a little lace edge that goes around it.  The box holds all of the cards inside.
The color is a little wierd on this card.  I decided to use some of the old paper from last year's mini catalogue.  I sometimes like paper so much that I won't use it!  Anyway, now I'm using plenty of it!
This card features the Kindess Matters stamp set - I just love the natural looking butterflies in this set.  I watercolored the bottom butterflies and added smooch to it.
By the way, did you know you can get this Kindness matters stamp set for FREE starting January 24?!?!?  Yes, it is a part of the FREE Sale-a-Bration products coming soon!!!  Free makes me like it even more!  ;)
This card is plain and simple - I switched to the scallop trim border punch here.
Another simple card - I like the pearls down the middle of the Always flourish here.
Do you know I've had this tulip frame embossing folder for nearly a year still in it's package?  Embarrassing, I know!  I did get it out and use it last night.  I added chocolate chip ink to the tulips to make them stand out.
This is probably my favorite card with the tulip folder.  I like the top not die sticking out from underneath and the chocolate chip scallop ribbon going across the card.

Stamps:  Always, Kindness Matters
Ink:  Chocolate Chip, Not Quite Navy, River Rock, Regal Rose, Rose Red
Paper:  Chocolate Chip, River Rock, Regal Rose, Rose Red, Very Vanilla, Springtime Vintage DSP (Retired)
Accessories:  Chocolate Chip scallop ribbon, Rose Red seam binding ribbon, linen thread, Early Espresso Baker's twine, Basic pearls, Tulip embossing folder, Smooch illuminate top coat, Top note die cut, Lace border punch, scallop trim border punch, Vintage rose (retired)

Friday, January 6, 2012

Love you - miss you - kiss you card

I threw this card together tonight out of some scraps.  My husband has been gone on a trip all week, so my daughter and I have been waiting on baited breath for him to come home!  We decided to make cards for him tonight to tell him how much we missed him!
I used the new P.S. I Love You stamp set for this card.  I colored the sentiment with Real Red and Basic Grey markers.  I punched it out with the 1" punch and the grey scrap with the postage stamp.  The heart is more Real Red and the heart punch.
My husband thinks having a pretty inside is just as important, so for him I stamped the cupid in Basic Grey and made a little trail of hearts out of a scrap of glimmer paper and the love you sentiment using the heart to heart punch.  I thought it was kind of cute!
I just hope he does, too!  :)

Stamps:  P.S. I Love You
Ink:  Real Red, Basic Grey
Paper:  Basic Grey, Real Red, Whisper White, Red Glimmer Paper, Retired DSP
Accessories:  Heart punch, Heart to Heart punch, small heart punch, 1" square punch, postage stamp punch, real red satin ribbon, basic glimmer brads

Thursday, January 5, 2012

Photo wallet and matching card

I have made a similar mini album like this before, but I loved the idea of a photo wallet with this belly band that you can just slide right off the wallet.  I thought it was too cute - and no velcro necessary! 
Almost all of the supplies for this project came from a retired Simply Scrappin' kit called Summer Home that I got off of the clearance rack a year or two ago. 
The original tutorial idea came from UStamp - Let's Score!
So, when you first open it, there are two spots for pictures - the only additional supply right here is a glimmer basic brad - the copper shaded brad in the center of the circle here.
And here it is opened but not folded out.  Again, basic pieces here - a vintage trinket brad in the square sticker.  The banner is made from circles I cut in half and placed under some Cherry Cobbler Baker's Twine. 
And here is the first fold out - nice open spots for pictures to be added.
Finally, it is completely open here - I probably made this entire mini album and the matching card below in an hour and a half.  Obviously there is nothing that is earth shattering about it, but it is a great album to use as a gift or even as a quick spot for some of those pictures you've been meaning to print out for months!  (Did I say months?  Oops.....time to get some pics printed!!!)
Here's a quick little matching card - mostly just scraps here.  I added some Baja Breeze grosgrain ribbon and a basic pearl. 
I think I have just the person in mind to give this to, also!

Paper:  Chocolate Chip, Baja Breeze, Kiwi Kiss, Whisper White, Riding Hood Red, Summer Home DSP (retired)
Accessories:  Summer Home stickers (retired), basic rhinestones, basic glimmer brads, vintage trinkets, baja breeze grosgrain ribbon

Wednesday, January 4, 2012

One more page in the pregnancy journal

I had a few more ultrasounds from the last time I had an ultrasound (back in NOVEMBER!).  Anyway, I figured I'd better get them scrapped before they curled up like the other pics! 
The first pic shows us that it's a boy....how they ever see that, I'll never know!  I believe the other one is a picture of his feet.  I had a few more, but I just picked two pictures for now. 
Next week I have another appointment....maybe I'll get some more ultrasound pics - some that look closer to what our sweet baby will look like in just a few months! 

Paper:  Marina Mist, Pear Pizzazz, Nursery Nest DSP
Accessories:  Nursery Nest cardstock stickers, rub-ons & 3-d stickers (Pebbles)

Tuesday, January 3, 2012

Quilted page and card

On the UStamp class I'm taking right now, they gave a sample of a quilted page that looked similar to this.  While I used different papers from the original version, I pretty much went by the tutorial and cased the majority of the original version - I really liked the look of it!
Plus, Practical Scrappers had a challenge to try one of the new trends of 2011 and while I have tried many of those trends, this was on my list to try - a pinwheel or a quilted look. 
For this layout, I just wanted to accentuate our great food that we had on our Disney trip.  I decided to use the Cheerful Treat DSP that is in the hostess section of the big catalogue.  I love the bright and cheerful colors. 
On the title and heart, I used some retired chipboard and drug it through some VersaMark ink.  I embossed each little piece with Melon Mambo Embossing Powder.   I took a tiny swatch of the Lucky Limeade organza ribbon from the SAB catalogue and wrapped it around a few tiny sections just for accent.  Finally, I added some in color brads in the center of each pinwheel/quilt section.
And here's the other side of the page - mostly the same.  I decided to add a little doily from the Flirtatious DSP under the heart at the top.
Since I liked this technique so much, I decided to case the card, too!  More of the same paper - I just added a little Hello from the Elementary Elegance stamp set in the SAB catalogue.

Stamps:  Elementary Elegance
Ink:  Concord Crush, VersaMark
Paper:  Concord Crush, Cheerful Treat DSP, Flirtatious DSP, Lucky Limeade, Melon Mambo, Whisper White
Accessories:  In color brads, Lucky Limeade organza ribbon, chipboard (retired), Melon mambo embossing powder, scallop edge punch

Monday, January 2, 2012

Pregnancy journal and book has begun

I don't really know why I have put off creating this pregnancy journal for our coming son.  I suppose mostly because I started one for a baby back in February and lost the baby soon after starting the journal.  It broke my heart to just open the book and look at those little ultrasound pictures and know the only way we would ever meet that sweet baby was when we get to heaven. 
I finally decided last night that since we only have about 12 weeks to go until this baby will be here, I had better get to work on this journal! 
 
I started with this title page.  I am using the Nursery Nest paper and stickers as my overall theme with other pieces added in.  This page is Basic Grey and I made little booties out of the Stitched Stockings stamp set.  I had a few non-SU accents - the rub-on and the title and safetly pin.

Stamps:  Stitched Stockings
Ink:  Marina Mist
Paper:  Basic Grey, Marina Mist, Whisper White
Accessories:  Stocking punch, Nursery Nest die cut stickers, Island Indigo Baker's Twine, rub-on (Pebbles), Title, safety pin (making memories)
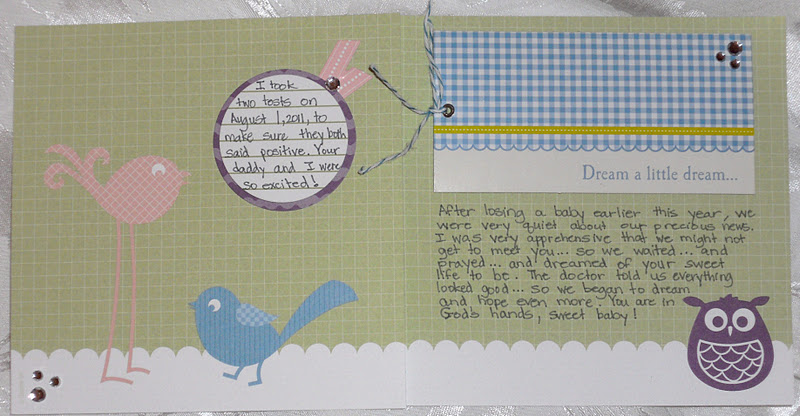
Here is a little page that talks about how mommy and daddy found out and how we felt when we first found out.  Nothing too exciting here - just journaling.

Paper:  Nursery Nest DSP
Accessories:  Basic Black journaling marker, Nursery Nest die cut stickers, basic rhinestones, Island Indigo Baker's Twine, tag (making memories)
And here are our first ultrasound pictures....you know, the ones that mostly look like you're growing a little kidney bean!  ;)  It's still sweet - no matter how tiny a picture!

Paper:  Pear Pizzazz, Marina Mist, Nursery Nest DSP
Accessories:  Nursery Nest die cut stickers, Glimmer Brads Basics
And for now the last two pages I made before bed were the journaling about who we told first.  I actually typed this out on my computer and printed it out in grey ink for these pages.  It was longer than the other journaling and I wanted to make sure the lines were straight! 

Paper: Basic Grey, Marina Mist, Whisper White, Nursery Nest DSP
Accessories:  Nursery Nest die cut stickers, Basic rhinestones, rub-on (Pebbles), onesie (making memories)

Sunday, January 1, 2012

Late gift card with a pop up

I purchased gift cards for my father in law for Christmas....only to find out he didn't need gift cards for this particular location.  So.....since I decided afterwards that he could always use gift cards from the farm store, I made him a late gift enclosure card.

I thought about making it Christmas themed, but I figured he would appreciate a more manly looking card, so I went with the old retired DSP from last years holiday mini.  I started with the new Labels Framelits and the new stamp set Just My Type.  The sentiment here is actually from the stamp set On Your Birthday.
On the inside, you see the pop up portion of the card.  Again, I continued with the retired DSP and also some retired card die cut pieces I'd gotten from the clearance rack.  I used one sentiment from the Punch Pals stamp set as well as another belated sentiment from On Your Birthday.  Hopefully even my hubby will approve of the not too girly card for his dad!
Stamps:  Just My Type, On Your Birthday, Punch Pals
Ink:  Early Espresso
Paper:  More Mustard, Crumb Cake, Retired DSP
Accessories:  Retired card die cuts, Labels Framelits, mini library clips, Early Espresso Baker's Twine, Word Window Punch, Modern Label punch, Decorative Label Punch, toothpick