Sunday, June 28, 2009

New catalogue sneak peek!

Here is a little sneakie peekie from the new catalogue...if you are in the stamp club, you will get your new cattie with your club order from this month. There are actually two things from the new catalogue on this page - the first is a new color, Crushed Curry; the second is a stamp set (which fits all the circle punches!) called Circle Circus.
Stamps: Defining Alphabet, Circle Circus
Paper/Ink: Basic Grey, Crushed Curry, Real Red, Bashful Blue, Whisper White, scraps of Urban Oasis DSP
Accessories: All of my circle punches! small tag punch, real red grosgrain ribbon, basic grey taffeta ribbon, stapler, stampin' dimensionals

Saturday, June 27, 2009

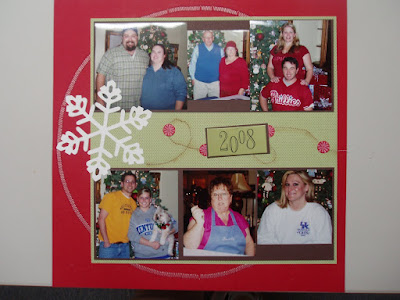
Christmas layout


I am finally posting something else this week. My little nephew, Gage Michael, was born this week, so I haven't done much of anything! Anyway....I used the good old Simply Scrappin' kit from last Christmas to make this page. Stamping was from my favorite stamp set for Christmas - Snow Swirled - it just matches the paper perfectly!
Stamps: Snow Swirled
Paper/Ink: Chocolate Chip, Whisper White, Real Red, Old Olive
Accessories: Circle Cutter, Chocolate Chip grosgrain ribbon, Scallop circle/edge punches, Hodgepodge Hardware, Real Red Brads, Making Memories red glitter stickers and eyelet, Daisy D's clear photo overlay, Jolly coaster (?)

Sunday, June 21, 2009

Inspired by Liz

I was inspired to create this card by Liz, one of my fellow SCS bloggers (look to the right and you'll find her blog - Scrapbooking, Sketches, and Life...Oh, My!). She created a very similar card to this and I decided I really liked the look and should try a similar idea with my own stamp set!
Stamps: Fresh Cuts
Paper/Ink: Pacific Point, Rose Red, Kiwi Kiss, Whisper White
Accessories: Pacific Point Grosgrain ribbon, clear embossing powder, large oval punch, scallop oval punch, horizontal slot punch, rhinestone

Saturday, June 20, 2009

SCS Card

I used the recent card sketch at Splitcoast Stampers to create this card. It is a clean and simple sketch, but all the layers makes a nice presentation.
Stamps: Thoughts and Prayers
Ink: Chocolate Chip
Paper: Pink Pirouette, Regal Rose, Chocolate Chip, Whisper White, Sweet Always DSP
Accessories: Paper piercing pad, Large Oval, Scallop oval punch, beads (for the center of the flowers)

Friday, June 19, 2009

Saying goodbye to the lovely in colors...

These two cards are completely not related, but I have been trying to make a stack of cards using all of the in colors that are retiring at the end of this month (boo-hoo!).
Colors: Kiwi Kiss, Riding Hood Red, Pink Pirouette, Whisper White, Chocolate Chip
Stamps: On Your Birthday, Polka Dot Punches
Accessories: Riding Hood Red DSP, Kiwi Kiss button, Red hemp twine
Colors/paper: Whisper White, Baja Breeze, Basic Grey, Kiwi Kiss, Walk in the Park DSP
Stamps: 8 Great Greetings, Great Friend
Accessories: 1 3/4" square punch, Baja Breeze striped grosgrain ribbon, Matchbox diecut, top note die cute, Big Shot

Thursday, June 18, 2009

Birthday cards for boys

I decided to make a few birthday cards for boys using the color scheme of the baby boy scrap kit. I always make cards just to make them and then when it is time for someone's birthday, I don't have what I really need, so I thought...wouldn't it be better to make a design that you like and then make several of them? That way, I can just pull one out of the file when I need it.
So here were the two designs I came up with. I liked them both, but I think I decided I liked the top card the best. My favorite part of the card below was the swirly stamp in the corner....although in retrospect, I don't really think it goes all that well with the birthday set...but anyway, I'll use it on another card!
And here are the specs:
Colors: Tangerine Tango, Chocolate Chip, Whisper White, Old Olive, Bashful Blue
Stamps: Party Hearty, Stitched Exotics
Accessories: 1/4" Old Olive grosgrain ribbon, blue glitter, corner rounder, 1/2", 3/4", 1 3/4" circle punches, large dot texture plate for Big Shot

Monday, June 15, 2009

More Club projects

In addition to the pendant/bookmark, we also made a matching pen and post-it note holder at our most recent club meeting. For each item, I used Washington Apple DSP and lots of Sticky Strip! In the picture above, you will notice a bouquet of funny looking flowers, those are our pens - Kittra will not have to worry about any of those silly guys she works with walking off with one of those! I just followed a tutorial on Patty's Stamping Spot to create these. Using 12" strips of 2-sided paper, you just make a 1 1/4", 1 3/4", and a 2 1/4" strip each of different papers. Make cuts almost all the way down every 1/4" or so and then apply 12 inches of sticky strip to the bottom edge. Next, wrap....and wrap....and wrap....you get the point. You MUST start with the shortest strip, then the medium strip, then the tallest strip. Finally, use a pencil to curl down the edges of your flower and with several, you will end up with a darling bouquet of pens or pencils!

These are the post-it note holders we created. I added some sticky strip to the back of my post-it notes to hold the pad down inside the cover. Wouldn't this be a cute ensemble to take with you in your purse? Or, better yet, just keep it right next to your phone - you won't have to look far to find your note paper and pen!

Sunday, June 14, 2009

Baby Gage's first year book

Well, these pictures are certainly not the greatest pictures - a little dark, but you can get the idea with them. I used Andrea Walford's terrific tutorial to create this album in about 2 hours one night last week. You can get lots of great ideas from her here: http://andreawalford.com
I didn't take any more pictures of this because this is about the same type of picture that was shown on her blog. I used the Baby Boy Simply Scrappin' kit to make this darling little book for my brother and his wife.
On the other side of each of the flaps are more spots for pictures or journaling. I made sure to use all of the stickers that had each month and the big firsts that come so quickly that first year of life. I thought this would be a great little booklet to keep in a purse that you can add to every now and then. I hope they like it!

Saturday, June 13, 2009

Coming soon...Baby Gage Owens

Well, I have another new baby coming in our family, so I made a little scrapbook and a card for him the other night while I was waiting on my hubby to come home. Here is the card I made for his arrival.
I used Tangerine Tango for the card base and some scraps of the baby boy Simply Scrappin' kit for the card. The star had a hole in the center of it, so I put a grommet and another sticker inside of that. Next, I stamped the Beautiful Little Baby sentiment in Chocolate Chip and Old Olive. Finally, I stamped the frame from Great Friend onto Bashful Blue to help anchor the sentiment down.

Thursday, June 11, 2009

I did it! I sewed on my pages!


My friend, Hannah, came over yesterday to scrap with me. I just love having adult playdates! Don't you? You should join us sometime! Anyway, since she was there (to help me if I tore anything up!) I decided I would sew on my scrapbook page. I have been wanting to for a long time, I just thought I would break my sewing machine or go through about 4 needles (believe me...it has happened before!)
Needless to say, once I figured out I could actually do it, I sewed all over the place on my pages! I was very pleased with the result. I was also very proud of myself that I got a picture of every single person in Toby's family for Christmas...for once! That is quite an amazing feat in itself.
If I have time tomorrow, I'll post a cute little album I made using Andrea Walford's incredible instructions. I made it for my brand new nephew...he is coming soon!

Wednesday, June 10, 2009

Will Ride 4 Food

In retrospect, I guess I could have made a page like this of myself...I think I would have called it Will Scrap 4 Food!
I made my own accents for this page using the big shot and a couple of sizzix die cuts. I added the small black grommets in the center of a few of them. I used a number 1 for the last L in the title, so since it was slightly shorter than the real L, I covered it up with a button and placed the R on top of it. Finally, I painted a piece of acetate to create my own frame for my picture. Before it finished drying, I sprinkled Dazzling Diamond glitter all over it just to add a little shimmer to it.
Colors used: Riding Hood Red, Pumpkin Pie, So Saffron, Washington Apple DSP.

Tuesday, June 9, 2009

Bookmark

Here is a picture of one of the projects we will be making at our club meeting on Sunday. If you are not like me (allergic to everything inside and outside!) and you can wear cute little pieces of jewelry, then I think this makes a terrific little pendant to wear around your neck. As I do happen to be allergic to all jewelry that is not expensive (boo hoo), I decided to make this as a bookmark for myself.
I used the Fresh Cuts stamp set and the Hodgepodge Hardware to make this. I saw it in the Stampin' Success magazine (a magazine for demonstrators -if you're interested, let me know!) and thought it was absolutely gorgeous!
Colors - Very Vanilla, Baja Breeze, Old Olive, and Riding Hood Red. I used the Designer label punch, a lot of Crystal Effects and an old pair of scissors to cut the bottom part off of both frames. Very cute, simple, and great as a gift!

Monday, June 8, 2009

New jumble alphabet stamps

Okay, so here are two very similar pages. They are almost mirror images, but not exactly. Sweet always, Pumpkin Pie, Pretty in Pink, and Chocolate Chip are used on both pages.
On the top page, I used the circle cutter to create a frame for the pumpkin pie picture. I accented the corners using a variety of buttons and even fit a small brad/button into the white grommet. I used some tiny photo corners to accent the frame and typed my journaling and accented each strip with an orange rhinestone brad.
Now in this page I used the opposite paper for this page. I carried over the button theme just a bit and then used the jumble alphabet to create a title for the pages. Basically, my little girl was all excited to feed her dad her pumpkin pie, but when it was her turn she quickly decided she wasn't that interested in it!

Sunday, June 7, 2009

Birthdays, anyone?

Well you would think it was birthday weekend here with all these birthday posts on here today! We went to a birthday party for a little girl turning 3 this weekend. She had a butterfly party, so I added a butterfly to her card. I used Pink Passion, Pixie Pink and Tempting Turqjoise on the colors. I also used the stamps Party Hearty, Polka Dots and Paisleys, and Flight of the Butterfly. Finally, to make the 3, I put glue all over a number 3 sticker, dipped it in lots of glitter, and THEN stuck it onto the card. (Can you guess that I tried the other way first? If you take the sticker off the backing and glitter gets on BOTH sides of the sticker, the chances are pretty slim that it's going to stick...don't ask me how I know that!)

So, here are a few pics of my own little birthday girl (yes, I know her birthday was in November...I'm finally getting caught up...little by little). The picture in this layout was one of my favorite pictures from her birthday party. This was after everyone left. It was just one of those sweet moments that happens almost every day...Toby tickling Halleigh...I just happened to catch it on camera! I used the Sweet Slumber DSP and the rub-ons/stamps from the level 3 hostess scrapbook and stamp set. They were terrific for birthday pictures! A little more of this paper from the hostess set. It was so cute for a birthday party page! And my favorite part was the lined paper that is perfect for journaling. I made some lazy gathering with the grey taffeta ribbon - all you have to do is use lots of glue dots (or a sewing machine if you're talented enough!)
Finally, a page I made using the colors of Halleigh's present from us. We found the Rose Petal Cottage at the consignment sale this year...it was a great present for Halleigh. This was my other favorite picture of Halleigh from her party. Just sheer delight at the opportunity to play in her new birthday toy.

Thursday, June 4, 2009

Potty training...forever? I hope not!

Before I write anything else, I must say that dark pink is NOT my choice for a toilet or any other bathroom fixture! But, of course, those kinds of fixtures are a little expensive to change, so I just went with the colors as I made this page. Hey...they matched!
Anyway, the sad thing is that these pictures were taken in November of 2008...8 months later...we are STILL not potty trained! I guess that's okay since my little girl is only 2, but none of the traditional ideas are working so far.
I used Rose Red for the background and Rasberry Tart DSP and Pretty in Pink for the accent papers. I dyed the flowers Cameo Coral. I used the Circle Cutter to make all those circle accents and continued that theme with several buttons (that took forever to thread!) by Making Memories. I also used a matching journaling sheet from Making Memories so I could circle the number 2. I liked how this page turned out - especially for a page on potty training!

Wednesday, June 3, 2009

Birds of a Feather


I made this page for Halleigh's peacock costume from last year. While I thought about waiting for the new in colors, I decided I needed to use up my retiring DSP, so I went with Rainbow Sherbert. I stamped the little bird image from the retiring Zoo-fari stamp set all along the bottom of the pages and then cut out the letters for the title from a sizzlits set that I have called Sunset. Finally, I used one of the printed window sheets to create the tail on the peacock. You can see it a little better in the second image. It's so transparent, it makes it difficult to see the 3-dimensional effect that it adds. I added a few Tempting Turquoise brads in it to hold it down and tie it together with the brilliant colors of the real peacock. My husband actually came up with the title and the journaling, which is hidden behind the second picture in a pullout.

Tuesday, June 2, 2009

Cool title idea

The idea for the actual layout came from Sketch #24 at the My Scrap Shoppe blog. Then I saw another layout in a Creating Keepsakes magazine that gave me the idea for the title. I can never find just the right shade of letter stickers to use for a title, so I decided to use some wacky color that I never use and sponge over top of it. I added a little chipboard letter H for the start of the title and then made some masks by tearing scrap paper. I used the matching Baja Breeze and Chocolate Chip ink to create a kind of torn paper look that would allow the title to pop out from underneath. After I was done, I simply removed the alphabet stickers and the original kraft color from below stands out above the ink.
The rest of the layout uses some retiring paper and ribbon :( Parisian Breeze and Valet ribbon, along with the baja breeze buttons. Oh, why, oh why, do we always have to lose these lovely colors? But, alas, new and beautiful colors will replace these in colors soon!