Wednesday, February 18, 2015

Lotus Blossom

IMG_4341

I took the dimensions for this card from Aly Schilling at Project Downloads on Demand.  I just adored this card and its simplicity.  Really, I adore the stamp set for this same reason!

This is a Sale-a-bration stamp set, so it is an exclusive stamp set you can only get when you spend $50 at Stampin’ Up.   The stamp set is photopolymer and the lotus blossom image has 3 stamps.  Each stamp is numbered with an arrow to help you know which direction you’re stamping as well as which layer you are on. 

I start with the darkest color and work my way to the lightest color when I use this stamp.  I’ll see if I can find some more cards to show you later this week with this stamp set!

Stamps:  Lotus Blossom

Ink:  Crisp Cantaloupe, Calypso Coral, Blushing Bride

Paper:  Whisper White, Calypso Coral, Old Olive, Stacked with Love DSP

Accessories:  Pennant Punch, Basic Pearls

Monday, February 16, 2015

Valentines

Well….I haven’t fallen off the face of the Earth….I’m just a mom of two kiddos and I have to conquer much before I can play with my stamps and blogs!  Needless to say, I have made plenty in the past several months…I just haven’t shared it with you.  Not that you missed me!  Winking smile 

Here are the two valentines I created for my hubs for Valentine’s Day.

IMG_4322

For this first card I used the Groovy Kind of Love stamp set and the heart punch.  Most of the placement was easy – just making the zebra striped heart have a 3-dimensional effect took 3 hearts – not two.  You stamp each of the 3 hearts and punch them out, fold each in half down the center of the heart and glue half of the heart to the next heart.  Once you have all 3 hearts glued together, then you can put it on the card.

Stamps:  Groovy Kind of Love

Ink:  Real Red, Memento Black

Paper:  Calypso Coral, Whisper White, Stacked with Love DSP

Accessories:  Heart Punch

IMG_4323

And, of course, you always need a nice manly card for him!  I wish they had made additional sentiments for this little stamp set – I think it is a great stamp set for male birthdays, etc.

This card is pretty straight forward.  I did stamp the trees before embossing.  I colored the rest of the image directly with my Stampin’ Write markers. 

Stamps:  Wood You Be Mine?

Ink:  Memento Black, Real Red, Blushing Bride, Blush Blossom, Soft Suede, Old Olive, Mossy Meadow, Smoky Slate, Basic Grey (markers)

Paper:  Crumb Cake, Whisper White

Accessories:  Woodgrain embossing folder, Texture Boutique, Burlap Ribbon

Monday, September 1, 2014

Frightful Wreath

IMG_3971

It’s funny…..I’m not much on decorating for Halloween.  Sure – I put up a few pumpkins and things that I’ve made over the years, but I usually just stick to traditional fall items.  This year, though, the items in the Holiday Catalogue are simply so amazing I think I am going to have to take out a loan so I can buy them all!!!! 

Take, for instance, this Frightful Wreath.  Any other year I would not buy a wreath for Halloween.  I’ve never had a Halloween wreath!  My two year old son, though, has played this little game with pretend spiders leftover from last year’s Halloween all summer.  We throw them out of a drawer…onto the floor….into the bath…you name it – he runs around screaming like he’s just seen a ghost.  “Piders!”  he screams with a look of terror on his face.

To anyone who doesn’t know him, they think he is truly petrified.  They feel sorry for him.  Poor little thing.  And then he does it over….and over…..and over……and over…..and over….

You get the point.  This has been his favorite little game all summer.  Needless to say, when he cried out, “Piders!” upon looking at this wreath in the catalogue…..he had me – hook, line, and sinker!


IMG_3973

This wreath was pretty easy to make.  Here are a few tips.

*Get your hot glue gun ready and keep lots of glue sticks at your side.

*When you hot glue the center of the accordion fold – put lots of glue in there and hold it.  Then hold it some more.  Keep holding.  Take a nap and hold it!  Just kidding!

*Re-ink your Basic Black ink pad just before you sponge those doilies and be very gentle.  They tear easily.  Fresh ink will make certain that they turn really black.

*In light of the last tip…..keep paper towels or napkins close by to hold those doilies if you don’t let them dry completely. 

*The spider took the longest to make – it is not hard – just tedious!  Good wire cutters and pliers/tweezers for wire will be very helpful!

Supplies:  Frightful Wreath Simply Created kit, Frightful Wreath photopolymer stamps, Tangelo Twist ink, Basic Black ink

Saturday, August 30, 2014

Calling all Superheroes to the City!

DSCF5508

I saw the idea for this card on another demo’s blog and couldn’t resist it!  I loved how she took a boy superhero stamp set and turned it into something elegant!

I started with a Daffodil Delight background (any yellow color will work for this, though).  I sponged Crisp Cantaloupe on the bottom and Calypso Coral on the top.  I stamped the cityscene on the bottom twice.  Make sure that you get the city scene all inked up nice and juicy!

I finished with the sentiment from Let Your Hair Down and a piece of Crushed Curry chevron ribbon across the center.  It really was that easy!

Stamps:  Calling All Superheroes, Let Your Hair Down

Ink:  Crisp Cantaloupe, Calypso Coral, Memento Black ink

Paper:  Daffodil Delight, Crumb Cake

Accessories:  Crushed Curry chevron Ribbon

Monday, August 25, 2014

Work of Art plaid

DSCF5507

I love the the Work of Art stamp set is so versatile!  We used it during our last club meeting to create our own plaid patterns.   We also played with Burlap Ribbon and found that our scallop edgelit is a great tool to cut ribbon!  (I just can’t use it very long…..I am terribly allergic to burlap!!!  Hello sneezes!)

Stamps:  Work of Art, Let Your Hair Down

Ink:  Melon Mambo, Daffodil Delight, Tempting Turquoise

Paper:  Tempting Turquoise, Whisper White, Daffodil Delight, Sweet Taffy DSP

Accessories:  Burlap Ribbon, Scallop Edgelit, Tag Topper Punch, Melon Mambo 1/8” ribbon, 1 3/8” circle punch, word window punch

Saturday, August 23, 2014

Maritime DSP

DSCF5504

I used the remnants of my Maritime DSP to create some different birthday cards.  I always need plain and boyish looking birthday cards, so I thought Maritime DSP + Age Awareness= perfect boy birthday cards!

DSCF5505

I really like this image – it’s cute and swirly, but not too much!

DSCF5506

And….once again, I like the fish on the DSP, but I don’t have any nautical stamp sets.  I cut some waves around the fish and used some scraps from the other cards and had a nice little finish.  Nothing too special or frilly for those boys!

Sunday, August 17, 2014

Maritime Ocean Gel Card

DSCF5501

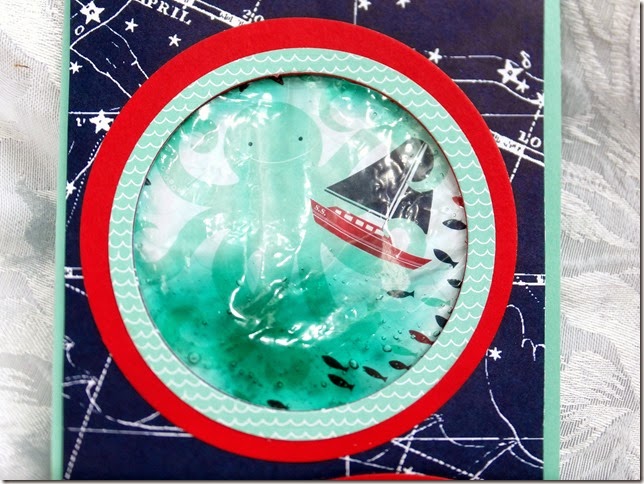
So recently I got some of the Maritime DSP to play with.  You will see quite a few cards coming that I made while playing with the DSP.  It is really cute and fun with the nautical theme.  Anyway, I loved the little octopus scene so much I wanted to really highlight it in a fun way, so I decided to make a gel card.  I haven’t made one of those in a while, so why not?! 
DSCF5502

Dimensions:

Pool Party Cardstock - 5 1/2" x 8 1/2"

Maritime Cardstock - 4" x 5 1/4",  4 X 4”, 3 ½ X 3 ½”

Real Red Cardstock - 4" x 4", Scrap – 2 X 3”

SCRAP Whisper White Cardstock - 2" x 3"

Supplies:

Boys Will Be Boys Stamp Set

Real Red Ink Pad

Pool Party Ink Refill

Circle Framelits

Project Life Cards & Labels Framelits

Aloe Vera Gel

Plastic Baggie

Sticky Strip

Stampin’ Dimensionals

Paper Snips

Instructions:

1. Fold the Pool Party Cardstock in half with a Bone Folder.

2.   Cut the Octopus image out of the Maritime DSP using the 3 ¾” circle framelit and adhere to the Pool Party base with SNAIL adhesive.

3.  Take a plastic baggie (I re-used an accessory bag) and fill it with the desired amount of Aloe Vera gel. 

4.  Add a few Pool Party re-inker drops into the aloe vera gel and mix inside the bag to the desired color .

5.  Apply Sticky Strip to the top and the bottom of the plastic bag and adhere to the Pool Party base.  Make sure the baggie will not hang out past the DSP that will cover it.

6.  Cut a 2 ¾” circle out of the Night of Navy Maritime DSP so it will go over the Octopus DSP .   Set aside.

7.  Cut a 3 ¾” circle out of the Real Red paper using Circle framelits.  Using the same piece of Real Red paper, place the 2 ¾” circle over the center and cut the inside of the Real Red circle out using the framelits. 

8.  Adhere the Real Red circle to the Night of Navy Maritime DSP, framing the circle.

9.  Cut a 3 ¼” circle out of the Pool Party Maritime DSP using the Circle Framelits.  Using the same piece of Pool Party Maritime DSP, place the 2 ¾” circle over the center and cut the inside of the Pool Party Maritime DSP circle using the same framelits.

10.  Adhere Pool Party circle to the Real Red circle, framing the circle as shown.

11.  Cut a Real Red label using the Project Life framelits.

12.  Stamp Happy Birthday sentiment using Real Red and cut the scrap to fit the label using Paper Snips. 

13.  Adhere red birthday label to the card front using Stampin’ Dimensionals.

14.  Using lots of Stampin’ Dimensionals (I used all of the outside edges of my package) adhere the card front over the plastic gel baggie.
