Monday, February 23, 2009

A tree for our hike!

Well, it's not very clear, but you can get the idea of the page I made last night. We went hiking in Morehead on the Sheltowee Trace last fall, so these pictures were from the beginning of our hike. I had a picture of the turtle, the Sheltowee Trace path symbol. I wanted to show how it was the symbol we followed throughout the hike, but I didn't want it to take up too much space. I thought a little while and decided I would make a tree on which the turtle could be displayed - just like on our hike.
To make the tree I first cut out several leaves in Old Olive using a Provocraft set of leaves I found in the fall. Next, I used sticky strips and LOTS of messy glue to wind common jute around to make a trunk. I stamped several of those circular spray images (I don't know how else to describe them!) onto Kiwi Kiss from the Good Friend set and cut them out with a circle punch. Layering them on with stampin' dimensionals finished off my tree. Finally, I added the turtle symbol.
To finish the page, I grouped all of the pictures together in the center of the pages and round the outside corner edges. After adding a Making Memories tag for the title and journaling, I made a little birdie using more Kiwi Kiss and Chocolate Chip ink. The legs and beak are More Mustard. I thought it was a good final touch to our page.


Sunday, February 22, 2009

Go Home, Piggy!

You probably can't tell from looking at this page, but this was my darling husband's birthday last year! Unfortunately for him, I was inspired to use lots of pink since my daughter's shirt had pink in it. We had a fun time at this game - the razorback mascots just loved Halleigh and kept coming to give her high fives. Sometimes she cried and sometimes she like it. Her favorite thing to say was, "Go home, piggy!"
As for the page, you may notice that I heat embossed flowers for the top border. The small flower in the left hand corner was crocheted by my dear friend Hannah. The Brilliant Blue was embossed using one of my embossing folders and my Big Shot. (I just love that thing!)

Saturday, February 21, 2009

My first tutorial

All right, by popular demand (okay, just the request of my darling club members!), I am going to do my very first tutorial. I am not the inventor of this fabulous idea, I CASEd the ideas of a fabulous blogger, http://symmetry.typepad.com/symmetry/
I saw her precious idea on Splitcoast Stampers and thought it would make a really cute little book to hold all of my passwords for my computer (although, now I think it is too cute for that purpose!!
Here goes...Cut a 2" X 4 3/8" piece of So Saffron paper, scoring at 2" and again at 2 3/8". Following the instructions on your Multipurpose Platform, run the piece through your Big Shot using the embossing plate of your choice.
Adhere a 16" piece of Chocolate Chip grosgrain ribbon to the center of the book cover.


Cut 2 pieces of Whisper White paper - one should be 2" X 10", the other should be 2" X 8". Score every two inches and fold. Adhere two of the faces together to create an accordian fold for the booklet.


Using Bashful Blue and Certainly Celery, ink the edges of the accordian fold.
Cut 8 pieces of your choice of Delicate Dots Designer Series paper to 1 7/8" each. Ink the edges with Bashful Blue and Certainly Celery and adhere to the pages of the accordian fold book.
Adhere the white side of the end pages to the inside cover of the book and fold the accordian into the book.
Close the book and punch a hole in the corner with your Crop-a-dile.
Tie small pieces of Chocolate Chip, So Saffron, and Certainly Celery ribbon to a binder ring.
Using a scrap piece of paper, cut out tag #3 of Lots of Tags and stamp images from Botanical Blooms onto the tag.

Using Bashful Blue and Certainly Celery, stamp the solid image over the outlines - it is OKAY if they don't match perfectly! This is called 2-step stampin' and it makes beautiful images!

Finish off the tag with 3 silver brads and adhere to the front and you will have a precious little 2X2" booklet to put on your keychain, backpack, or any other place you would like to display pictures.

Tip: You can punch images using your 1 3/8" square punch or another punch of similar size to go onto the pages.

P.S. - Almost all of the supplies used on this project are from the terrific Sale-a-Bration catalogue, so all orders of $50 will qualify for a free item of your choice. Plus, ALL orders will receive a FREE CATALOGUE!!! If you place any order on my website between now and February 28, you will be entered into a drawing for a Polka Dot Punches stamp set giveaway! Shop now at http://valeriedurham.stampinup.net/

Tuesday, February 17, 2009

Love Always

Once again, my scanner likes to focus on the very closest object in the screen and blur everything else, so this picture is not very good, but you get the idea.
Can I start by saying that my club members are AWESOME! I just LOVE to have club night with the gals. If you are not in a club and you enjoy scrappy/stampy stuff, being in a club is way too much fun to miss out on. Anyway, one of my terrific club members, Hannah, crocheted everyone these gorgeous hearts for this month's club meeting. So, of course, I HAD to make a project that used these beautiful hearts. I love to add handmade items.
I used a different color scheme - So Saffron, Chocolate Chip, Riding Hood Red, and Pink Pirouette. I used the Love Always stamp set and heart to heart punch and the Define your Life stamp set for the page. I stamped all the images in VersaMark and then used a dry paintbrush to brush some ruby red chalk over the images to bring out the image lightly. Then I added just a little linen thread to make my hearts dangle from the top of the page and finished off my handmade heart with a button.

Monday, February 16, 2009

Blog Candy

Sale-a-Bration is here! I love to get free stamps - and paper - and ribbon! Who can complain when you get free stuff? Here is a card I made modeled after a card displayed in the Sale-a-Bration catalogue. We will be making this card at our club meeting on Friday night.

If you like this set and you would also like to get a free SU catalogue, then you can win it! Just place any order on my ST demonstrator website between today and February 28. ALL orders will receive a free Stampin' Up catalogue, any order over $50 will receive a free Sale-a-Bration item, and one lucky customer will win an extra Polka Dot Punches stamp set - I'll pay the shipping if you live out of town!

Place your order on my SU website right here:
http://valeriedurham.stampinup.net

Saturday, February 14, 2009

Botanical Blooms

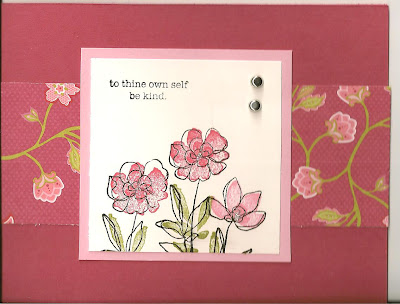
Here is the card we are going to make at my open house tomorrow. I have actually been a demo now for 5 months and have never had my own open house! This is the simple version for everyone coming.
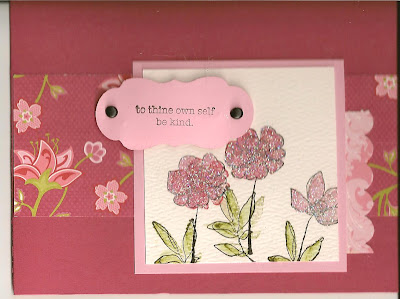
Here is the stepped up version of the same card. You will notice very slight differences. Instead of whisper white paper, I used watercolor paper and a blender pen to fill in the white space on the flowers and leaves. Also, I stamped the sentiment on a label cut out and lifted it up with stampin' dimensionals. I put glitter not just on the center, but all over the flowers. Finally, I added a small scalloped edge piece to bring out the Cameo Coral color.

Friday, February 13, 2009

Valentine Treats

Well, shoot me right now! I had this grand idea that I would make heart shaped pancakes and things all day tomorrow for Valentine's day to celebrate...my lesson has been learned. You obviously NEVER wait until the day before a holiday to find heart shaped items when you live in a small town! I finally found a lip cookie cutter and a 3 heart shape. Not what I wanted, but I'll have to live with it until next year!

Anyway, enough grumbling...these pictures are terrible because I almost forgot to take them! I remembered to take these pictures last night at about 11:00, so the lighting and picture quality is terrible, but, oh well...

The card above is what I put in the little bucket of treats for all of the workers at my daughter's daycare. I decorated some of the buckets with some of SU's decor elements to add a little flare to the buckets. The cards were at the top of the bucket. As you can see, my 2-year old helped me make them.
Here is the front of the bags I made. I used the bottom 4 inches of a paper bag, a 4 X 5 1/4" card with a top note die cut for the front and back, and I punched an oval out of the top for the handle. I didn't bother to put the back picture in - it also had the top note, but my daughter drew a picture (or scribble as it may be!) and I wrote a note to tell what it was.
The overhead shot of all the goodies for the kiddos at the daycare. It is a much better picture, too bad we have a bunch of chocolate left! I guess I'll have to share it with all the people coming to my open house on Sunday!


Sunday, February 8, 2009

Happy Valentines to my darling daughter!

I'm thinking that since Valentines is on a Saturday, we will go with an all hearts theme for breakfast and lunch. Heart pancakes and those kinds of ideas sound terrific! So along with that theme is my Valentine for my daughter who LOVES any zoo animal (except alligators and snakes today...). Anyway, as soon as I saw my friend Lori's new websitehttp://thepinkelephantchallenge.blogspot.com/ I knew I had to make this card! I saw a card on SCS that inspired me to make this little Valentine card for my baby girl and I used this sketch from http://cardpositioningsystems.blogspot.com/ to help me design the card. Now...if only I could figure out how to keep a 2 year old child from taking all the pieces off of the cards I make for her to keep!

Saturday, February 7, 2009

Addicted to heat embossing!

You would think with my recent posts that I am addicted to sketch challenges! The reality is, I think I'm addicted to heat embossing...as you can see in my card. I just got this set yesterday from a friend who was getting rid of some stamp sets. I couldn't resist using different shades of colors to make the horse look like it was running. I did an emboss resist by using my brayer over the horses running. Then I embossed the wanted and the star in silver to finish it off! I just loved the look!


Thursday, February 5, 2009

One last card!


Well, school is back in session tomorrow, so I doubt I will get to do too many more cards and pages, but I thought I would try and do one last card before my time is up! Here is a card I made using the For You stamp set and the Urban Garden paper. I was going to send this to a friend, but I decided I liked this card too much to give it away! BAD GIRL! I will make my friend a new card, never fear!

Paper piercing template using my embosslit!

As usual, I missed the deadline for this blog by just 2 hours! Ack! Oh, well, it served as good inspiration for me. I decided instead of using a flower as shown, I would try my embosslit flower and pierce the paper around it.
Here is my first attempt. All supplies on both cards are SU. I used the Rasberry Tart paper for it.
Here is the second attempt. Sometimes I am amazed at how different a card can look when you scan it in! The middle piece there is actually Real Red, although it looks a little orange from here. I tried a different color combo - Real Red, Kiwi Kiss, and Pacific Point Blue. It looks much prettier together in person!


Wednesday, February 4, 2009

Page Maps Contest

Ah, Becky Fleck, the Page Maps genius! I just love to use sketches and maps to guide my pages. Sometimes my pages just seem to take a different direction than where I would normally have gone. Thank you, Becky for helping me scrap a little bit outside of my normal box! Check out the Page Maps homepage here: http://www.pagemaps.com/blog.php
And here you see what I did with the sketch. This was the "Dressing Jazz" day at preschool. Since I like to create double page layouts, I just tried to extend what I was doing on the left hand side of the page to help it coordinate. And if you put both sides together, here what it will look like! You'll notice a visual triangle with my flowers and rick rack. You know what's funny? I have been wanting to use this lined Noteworthy paper forever because I thought it would be perfect to journal on, but I ended up not even writing anything on it! It's funny how that happens!

Tuesday, February 3, 2009

Unique - scrapbook challenge

Can you tell that we're having lots of snow days here? Not that I don't enjoy scrapping, but I'd personally much rather be out of school in May! Here is a sketch that I found on Splitcoast Stampers and thought I'd give it a try. Most of the sketches I see are for cards, so I enjoy finding a good scrapping sketch here and there.
The bottom picture of the sketch gives you a slightly better picture of the dazzling diamonds glitter I used on the small flowers at the top and the irridescent ice embossing powder I used on the baja breeze flowers.

Outdoor Fun

I know you're not going to believe this, but I started the left hand page by using this sketch. Somehow, it didn't quite turn out that way. You know how pages go, all sketches are just a little bit of inspiration for the end result!
One of our favorite family activities is going hiking in the spring, summer, and fall. Fortunately, we are blessed to have a child who gets VERY excited to go hiking with us! This scrapbook page uses a retired simply scrappin' kit called Out and About. Very outdoorsy!

Sunday, February 1, 2009

Valentine Stamp a Stack

If you sign up for the Valentine class on Sunday, this is what you are going to be making! Just imagine - 20 cute valentines and a mailbox into which you may place them!
This is the same design that you see on the front of the mailbox. I thought the V in LOVE looked like a vase, so I colored it in with water. I like how it added a little personality to it!
I liked using the heart to heart punch to make this little butterfly, and I thought the sentiment would go well on a Valentines day card.

The dimension at the top of this card was made by punching out holes with a 1/2" hole punch and putting them on top of the same color. I thought it kind of looked neat.

I saw another blog that used the oval punch on the birds and thought it was so cute, I wanted to try it myself. I embossed the heart to heart image on the hearts at the bottom with irridescent ice and then punched them out for the bottom and top.

Here is a picture of the mailbox I made to hold all of the valentines. It was super easy to make! I tried to tie it in to the cards by using some of the same designs so that everything matches and coordinates. Are you in the mood for love yet?