Saturday, September 29, 2012

Glossy Paper experiment

Do you ever order a product and then never use it?  (Insert hand raised very high right here!)  That would be me.  Guilty.  Product not used:  Glossy Paper
Why have I not used it?  I was scared to ruin it.  Crazy, I know.  I buy specialty papers and then never use them because they cost more than regular paper and I hate to waste it.  Then again....not using it IS wasting it, isn't it?! 
 
Needless to say, today I went for the glossy paper and played.  Sure, I had 3 out of 5 images that I only liked moderately well, but that is all part of the experimentation.  And I used less than a sheet of paper for it all.  Plus, I got two Christmas cards made! 
So here is the first card that I made.  I tried to add some Platinum shimmer paint to the paper and then dabbed Island Indigo and Pool Party re-inker with alcohol all over the image.  It turned out nicely.  I added some Pool Party ruffled ribbon and left it alone.
For some reason my tree image wasn't getting sufficient ink in the center.  I love the way this image turned out, though.  I didn't add any shimmer paint at all - just the cotton swab with alcohol and re-inkers.  Isn't it gorgeous the way it turned out?  I couldn't resist a little bling with the rhinestones.  Loved this card!
 
Stamps:  Snow Swirled, Christmas Greetings
Ink:  Island Indigo, Pool Party, Whisper White
Paper:  Whisper White, Glossy white, Naturals DSP, Island Indigo, Pool Party
Accessories:  Clear EP, Island Indigo baker's twine, basic rhinestones, corner rounder, Pool Party ruffled ribbon, rubbing alcohol

Thursday, September 27, 2012

We're Here! Scrapbook Page

Pinwheels on Parade made this a super duper easy scrapbook page to put together!  There's not really much to say - I used the border stickers and cut them to different lengths under the pictures.  The pinwheels stick together perfectly and I added some Basic Rhinestones on top.  This one went together fast....that's a good thing these days!

Wednesday, September 26, 2012

Day of Gratitude floral framelit card

Since I had my Day of Gratitude stamp set out, I decided it would go really well with the floral framelits.  Too bad there is not a framelit the size of the medallion!  Anyway, it layers really well with the framelits.  It inspired me to create this card.  I just put the fold a little short of the top edge of my framelit to turn it into a card - it was really super easy!
 
Stamps:  Day of Gratitude
Ink:  Gumball Green, Rasberry Ripple, Cajun Craze, More Mustard, Island Indigo
Paper:  Island Indigo, More Mustard, Very Vanilla, Orchard harvest DSP
Accessories:  Floral Framelits, In Color Dahlias, Basic Pearls

Tuesday, September 25, 2012

Chevron scrapbook page

I've been making it my goal this year to not simply stick with all girly scrapbook pages, since I do have a tendency to get frilly!  Anyway, I thought that chevrons were the perfect addition to a not too girly page! 
Here is the left page - I just added the medallion from the Day of Gratitude stamp set and a stamp from a retired In a Word stamp set here.
Here is a closeup of the medallion.  I actually ended up stamping an extra medallion in Midnight Muse for underneath - it really made it pop.  I added a Dahlia in the center - they look just perfect in the center!
Here is the right side of the page - just more of the same with a few leaves and acorns added.  These pages will be perfect for some of those pictures at the pumpking patch that will be coming soon!
Here's an upclose of those leaves - the Pool Party leaf was a little light, so I added some Cajun Craze accents to it to make it stand out.
 
Stamps:  Day of Gratitude, In a Word
Ink:  Summer Starfruit, Cajun Craze, Soft Suede, Pool Party, Midnight Muse
Paper:  Soft Suede, Midnight Muse, Summer Starfruit, Very Vanilla, Comfort Cafe DSP
Accessories:  In color dahlias

Monday, September 24, 2012

Hello Papillion card

I was inspired to create this card from a card I saw made by Jennifer Picard, stamper extraordinaire.  I took her basic idea and changed it to fit what I had in my stash.  Hers is obviously much more beautiful!
I used a Basic Grey background and the Howlstooth and Scaringbone DSP for this card. 
 
Stamps:  En Francais, Hello, Doily, Delicate Doilies, Papillion Potpourri, Delightful Dozen
Ink:  Basic Grey, Basic Black
Paper:  Basic Grey, Tangerine Tango, Very Vanilla, Howlstooth and Scaringbone DSP
Accessories:  Butterfly punch, 1 3/8" circle punch, Vintage faceted buttons, Basic Rhinestones, retired lace ribbon, dotted ribbon punch, lacy brocade impressions folder

Sunday, September 23, 2012

Googly Ghouls Treat Bags Stepped up

Here are two more of the Googly Ghouls treat bags that I made recently.   I have had these little ideas floating around in my head, I just hadn't gotten to it yet.  Yesterday during our fabulous stamp club time (you missed an awesome time if you weren't there!), I showed my gal pals how to step up these little babies.  You can fix in 5, 8 or 10 minutes! 
So, here's how to fix a bag in 8 minutes or less - you take the bag and emboss it with the spiderweb embossing folder (or other folder of your choice), stamp, add the googly eyes, baker's twine, and adhere that tag to your bag!
And for my personal favorite, this is the 10 minutes or less bag. 
1.  Dust off the bag with the embossing buddy! 
2.  Stamp bag with Distressed Dots in Versamark ink. 
3.  Pour Tangerine Tango Embossing Powder on the stamped image.  Emboss with heat gun.
4.  Stamp Frankie on the tag.
5.  Color Frankie Old Olive and add some googlies.
6.  Add Old Olive ribbon and adhere to bag. 
 
Stamps:  Googly ghouls, Distressed Dots
Ink:  Basic Black, Old Olive, VersaMark
Accessories:  Ghoulish Googlies kit, Spiderweb embossing folder, Tangerine Tango EP, Old Olive grosgrain ribbon

Saturday, September 22, 2012

Cute Christmas card

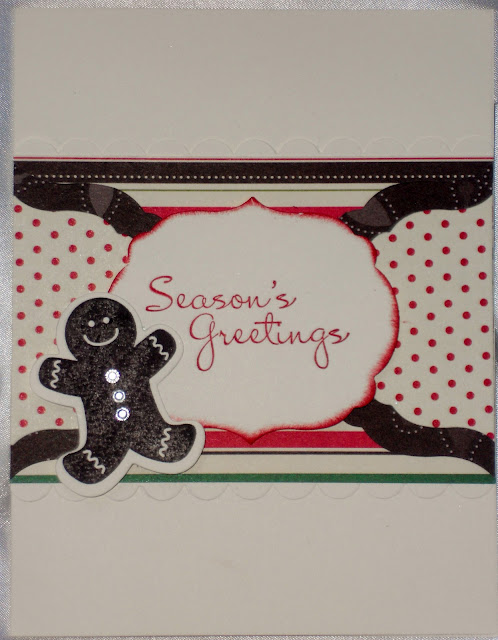
Here is a quick and easy Christmas card I made using the scraps in my scrap bags!  I simply started with a vanilla card base and a few Labels Framelits cut out of my scraps.  I stamped a quick greeting and a cute little gingerbread man.  I cut the gingerbread man out with my big shot and added rhinestones.  It's so quick he yelled out....you can't catch me, I'm the gingerbread man!
 
Stamps:  More Merry Messages, Scentsational Season
Ink:  Chocolate Chip, Real Red
Paper:  Very Vanilla, Retired DSP
Accessories:  Labels and Holiday Collections framelits, basic rhinestones, scallop edge punch
 
You can make this card and several more at my card class on Saturday,  October 6 from 1-4 p.m. at my home. Here are the 7 cards from which you can choose - You can make as many cards as you would like. The cards are $2 each, you just have to tell me which cards you would like to make and how many you would like. 
 

Thursday, September 20, 2012

Very Merry Christmas card

Here is another card I made last weekend as I was coming up with some cards for my card buffet class.  I thought this card was elegant, but not too terribly difficult to make.  I think the flower was the most intensive part of the card - and with our new sticky rounds, it was even easier! 
Stamps:  En Francais, More Merry Messages
Ink:  Cherry Cobbler
Paper:  Crumb Cake, Naturals DSP, Brights DSP
Accessories:  Ornament punch, Cherry Cobbler scallop tulle ribbon, Cherry Cobbler baker's twine, basic rhinestones, vintage faceted designer buttons
 
And just in case you wanted to make a few Christmas cards.....I'm having a Christmas card buffet on Saturday, October 6 from 1-4 p.m. at my home.  Here are the 7 cards from which you can choose - You can make as many cards as you would like.  The cards are $2 each, you just have to tell me which cards you would like to make and how many you would like. 


Tuesday, September 18, 2012

Googly Ghoul cards

I don't usually make Halloween cards, but I really just adore this stamp set and these self-adhesive googly eyes.  I don't know about you, but growing up, I just loved any craft that included googly eyes....I just hated getting all the glue off my fingers!  So, to me - this is the perfect combination of fun and cute for Halloween!
Here are the two little witch cards - I added some scraps to make banners on the second card.  The first card I made a scallop circle flower and put a spider in the middle - got that idea from Becky Roberts, stampin' queen!
I came up with this idea from another card I saw.  I punched a square out of a larger square and layered that over some DSP.  I added a Cream Confetti scrap banner and punched some circles for the bat to fly on - simple, but cute.  Doesn't that bat look mischievous?  In a cute way, of course!
 
Stamps:  Googly Ghouls
Ink:  Basic Black
Paper:  Tangerine Tango, Basic Black, Very Vanilla, Confetti Cream, Howlstooth and Scaringbone DSP
Accessories:  Old Olive & Tangerine Tango markers, Googly eyes, 3/4" & 1" circle punches, 1 1/4" scallop circle punch

Monday, September 17, 2012

Connie Stewart card case

I saw this card on Stampin' Connection, the demonstrator sharing site, and just had to case it!  (CASE refers to Copy and steal everything!).  I used the ornament keepsakes stamp set and the holiday ornaments framelits to create the ornament.   The base of the card was embossed with the Lacy Brocade embossing folder and the big shot.  This is one of the cards we will be making during the Christmas card buffet in October - more details to come soon! 
 
Stamps:  Ornament Keepsakes, En Francais
Ink:  Soft Suede
Paper:  Whisper White, Soft Suede
Accessories:  Lacy Brocade Embossing Folder, Holiday Ornaments framelits, Early Espresso Baker's twine, Basic Pearls

Sunday, September 16, 2012

Peek a boo ribbon card

I saw an idea for this card on Pinterest and decided I needed to make my own version of the card.  I was afraid it would take a lot of ribbon, but in retrospect, it was actually very little ribbon at all!  Since I have not gotten to purchase any of the new Christmas DSP, this was a great way to add some design without making a special purchase just for a card.
 
Overall, it was very easy to make. 
1.  Lined up your Holiday Collection framelit dies on crumb cake cardstock and run it through the big shot. 
2.  Trace the outline of the cutouts onto a white cardstock base.
3.  Place adhesive over each of the tracing spots.
4. Line up scraps of ribbon to cover each outlined spot.
5.  Add some doodles around the edges as desired.
6.  Tie some Baker's twine around the crumb cake piece.
7.  Adhere to the card base.
You're done!
 
Paper:  Crumb Cake, Whisper White, Daffodil Delight
Accessories:  White Uniball gel pen, Cherry Cobbler baker's twine, Holiday Collection framelits, ribbon scraps

Saturday, September 15, 2012

Marvelo{us}

I'm starting a vacation album from this past summer, so I thought I'd start with this picture.  This picture was taken right after we arrived in Williamsburg, Virginia.  We ate at this delicious restaurant called Food for Thought - it was delicious, home cooked food and our company with each other was delightful!
My inspiration for this page came from another Scrapbook Trends magazine layout.  I used Tempting Turquoise for the stamp as well as the color spritzer tool.  I made a little hodge podge banner with scraps and bits around my desk. 
The flowers I made with my Floral Frames die cuts.  For the fabric flower above the picture, I spiral cut it and wrapped it around on a Jumbo Sticky Round.  It gave it really nice dimension.
 
Stamps:  In a Word
Ink:  Real Red, Tempting Turquoise
Paper:  Whisper White, Island Indigo, Summer Smooches DSP
Accessories:  Island Indigo Baker's Twine, Bright buttons, Red corduroy brad, mini clothespin, small heart punch, Summer Smooches brads, Color Spritzer tool, Floral Framelits die

Thursday, September 13, 2012

Notes and Details

I saw a page that had a similar look in a recent Scrapbook Trends magazine and just love it, so I decided to take some inspiration from that layout.  I took some scraps from the retired Spring Fling Simply Scrappin' kit to create the base of the circles going up the page.  I added several stamps from Circle Circus to the page as well.  I also added several stamps from the Notes and Details stamp set.  I added some pewter and Melon mambo embossing powder to several of the stamps for a super glimmery look!  It is so pretty in person!
Here's a little closeup - Silver Smooch Spritz across the background.  I also pulled out several little brads and buttons in the color scheme to the circle spots. 
 
Stamps:  Circle Circus, Notes & Details
Ink:  VersaMark, Basic Grey
Paper:  Certainly Celery, Simply Scrappin' Kit
Accessories:  Certainly Celery buttons, Daffodil Delight seam binding ribbon, fabric brads, silver glimmer brads, 1 1/4" circle punch,
 

Tuesday, September 4, 2012

Orchard Harvest DSP - so gorgeous!

I tried to resist this Orchard Harvest DSP just like I tried to resist the Perfectly Preserved stamp set.....it didn't work!  The DSP is just so gorgeous!  I love this gingham print and the color combo is so bright for fall! 
I took the idea for this card from a card that I saw created by Becky Roberts.  She makes the most fabulous paper flowers - mine don't measure up in the least bit! 
And since I was just going with a blank, all occasion card, I decided I would spruce up the inside with a few scraps - that way if I don't have a gel pen I can still write on the inside! 
 
Paper:  Early Espresso, More Mustard, Orchard Harvest DSP, First Editions DSP
Accessories:  More Mustard grosgrain ribbon (retired), Scallop circle, 1 1/4" scallop circle punch, Delicate Designs embossing folder

Monday, September 3, 2012

Quick thank you card

Since my husband recently lost his job to budget cuts, it has been imperative that we put items in our local consignment sale!  God knows what He's doing even when we don't see the forecast for our future, that is certain!  We have saved all of our daughter's clothes since she was a baby (the good clothes!), so it was definitely His timing for us to be able to put all of these clothes as well as some large items like a jeep and a cabin in the sale this month!    I think we have enough to cover this month's house payment....
Anyway, working on all of that has made me completely exhausted lately, so finding a little mojo has been rather difficult.  I did, however, get enough mojo to make these Thank You cards for my club members.  
 
Stamps:  Day of Gratitude
Ink:  Pacific Point
Paper:  More Mustard, Orchard Harvest DSP
Accessories:  Chocolate Chip grosgrain ribbon (retired)